Tuesday, August 30, 2016
This tutorial is written for those with knowledge of PSP
Supplies Needed:
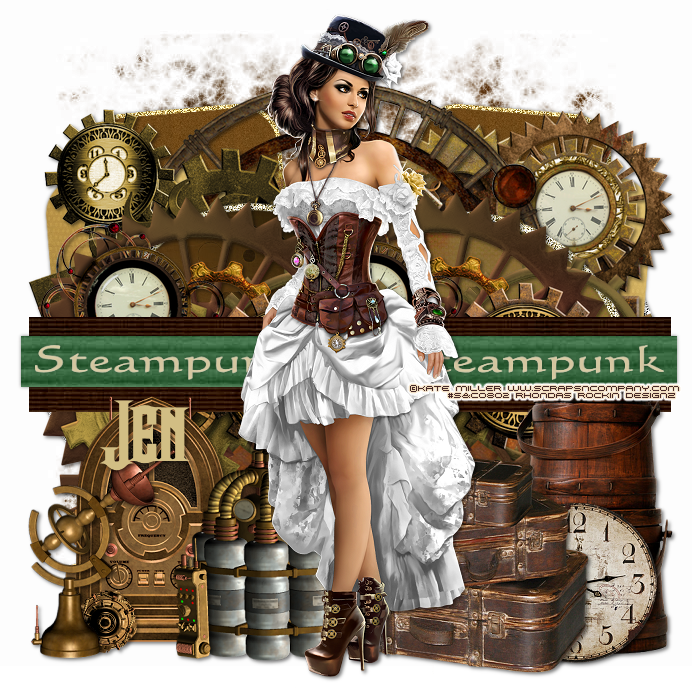
Tube of choice: I'm using the wonderful art work of Kate Miller
You must obtain a license to use this art at S&Co HERE
PTU Scrapkit from Jens Sweet Temptations form the Shares of Brown Collab
You can purchase this awesome kit ONLY at S&Co HERE
Template # from Froschi HERE
Mask of choice
Ok Lets get Started:
Open template - Shift D to duplicate then close out original
Resize to your liking
Canvas size 700x700
Delete copyright
Click on layer 1 selections,select all, float,defloat
paste a paper of choice from the kit - I used paper8
selection invert delete
select none delete the original
Recolor oval circle and add noise with settings of choice
Click on layer 3&4 selections,select all, float,defloat
paste a paper of choice from the kit - I used paper2
selection invert delete
select none delete the original
add border with noise
Click on layer 5&6 selections,select all, float,defloat
paste a paper of choice from the kit - I used paper
selection invert delete
select none delete the original
Click on layer 7 selections,select all, float,defloat
paste a paper of choice from the kit - I used paper7
selection invert delete
select none delete the original
Click on layer 9 selections,select all, float,defloat
paste a paper of choice from the kit - I used paper5
selection invert delete
select none delete the original
Click on 8&10 selections,select all, float,defloat
Recolor and add noise of choice
Click on layer 11 selections,select all, float,defloat
add new layer and flood fill with any solid colot of choice
selection invert delete
select none delete the original
Click on layer 12 selections,select all, float,defloat
paste a paper of choice from the kit - I used paper9
selection invert delete
select none delete the original
Click on layer 13 selections,select all, float,defloat
paste a paper of choice from the kit - I used paper10
selection invert delete
select none delete the original
Place your tube
Now time to add our elements
I used the following:
Element 4
Element 14
Element 26
Element 27
Element 28
Element 29
Element 51
Element 53
Element 57
Element 59
Element 66
Element 68
Element 71
Element 85
Merge your layers
Open paper of choice & apply mask
Place your name where you like it
Add the Copyright and your License Number for the tube
Resize to your liking and save as PNG
This tutorial was created on August 30 25,2016 by Rhonda
Any resemblance to another Tag or Tutorial is purely coincidental

Monday, August 29, 2016

This tutorial is written for those with knowledge of PSP
Supplies Needed:
Tube of choice: I'm using the wonderful art work of Joe Cano
You can purchase his work at his store HERE
PTU Scrap Kit by Reineke Designs called Schoolgirl 2
Kit cam also be purchased at Cano Store HERE
Kit and tube match and can be purchased as 1 item
Template #5 by Melissaz Creationz HERE
Scroll down a look to right side of blog for zipped files
Mask of choice
Ok Lets get Started:
Open template - Shift D to duplicate then close out original
Resize template 122% all layers
Cancas size 700x700
Deleted copyright
Click on semi circle selections,select all, float,defloat
paste a paper of choice from the kit - I used paper6
selection invert delete
select none delete the original
Click on dark rectangle selections,select all, float,defloat
paste a paper of choice from the kit - I used paper3
selection invert delete
select none delete the original
Click on light rectangle selections,select all, float,defloat
paste a paper of choice from the kit - I used paper9
selection invert delete
select none delete the original
Click on dotted rectangle selections,select all, float,defloat
paste a paper of choice from the kit - I used paper10
selection invert delete
select none delete the original
Click on circle selections,select all, float,defloat
paste a paper of choice from the kit - I used paper5
selection invert delete
select none delete the original
Click on dotted circle selections,select all, float,defloat
paste a paper of choice from the kit - I used paper8
selection invert delete
select none delete the original
Click on circle frame selections,select all, float,defloat
paste a paper of choice from the kit - I used paper1
selection invert delete
select none delete the original
Click on frame background selections,select all, float,defloat
paste a paper of choice from the kit - I used paper9
selection invert delete
select none delete the original
Paste close-up of tube to each frame
selection invert delete
select none delete the original
apply Xero Radiance with setings of choice
apply PhotoEffex Scanlines to tubes
Click on frames selections,select all, float,defloat
paste a paper of choice from the kit - I used paper8
selection invert delete
select none delete the original
add noise with settings of choice
Place your tube
Xero Radiance with settings of choice
Now time to add our elements
I used the following:
Element 4
Element 5
Element 6
Element 8
Element 9
Element 11
Element 16
Element 17
Element 18
Element 26
Element 28
Element 29
Element 31
Element 32
Element 34
Merge your layers
Open paper of choice and apply mask
Place your name where you like it
Add the Copyright and your License Number for the tube
Resize to your liking and save as PNG
This tutorial was created on August 28,2016 by Rhonda
Any resemblance to another Tag or Tutorial is purely coincidental
Saturday, August 27, 2016
This tutorial is written for those with knowledge of PSP
Supplies Needed:
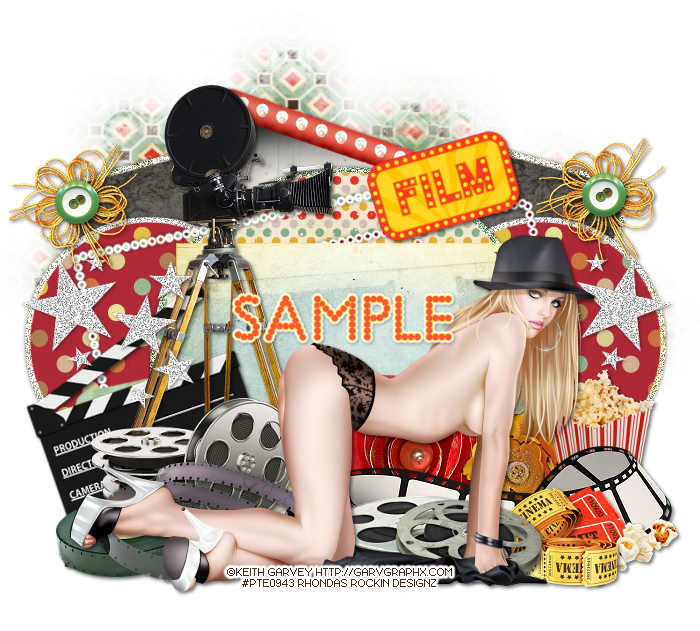
Tube of choice: I'm using the wonderful art work of Keith Garvey
This tube was purchased at PTE which has closed
You must obtain a license to use this art now at his store HERE
PTU Scrapkit from Raspberry Road Designs HERE
Movie Template #1 from TwyztedT's Playroom HERE
Mask of choice
Ok Lets get Started:
Open template - Shift D to duplicate then close out original
Resize template to your liking
Canvas size 700x700
Delete copyright
Click on raster 5 selections,select all, float,defloat
paste a paper of choice from the kit - I used paper2
selection invert delete
select none delete the original
add border with noise
Click on raster 6 selections,select all, float,defloat
paste a paper of choice from the kit - I used paper11
selection invert delete
select none delete the original
add border with noise
Click on raster 2 selections,select all, float,defloat
paste a paper of choice from the kit - I used paper6
selection invert delete
select none delete the original
add border with noise
Click on raster 9 & copy of 9 selections,select all, float,defloat
paste a paper of choice from the kit - I used paper7
selection invert delete
select none delete the original
Click on raster 4 selections,select all, float,defloat
paste a paper of choice from the kit - I used paper5
selection invert delete
select none delete the original
Click on raster 7 selections,select all, float,defloat
paste a paper of choice from the kit - I used paper4
selection invert delete
select none delete the original
Click on raster 3 selections,select all, float,defloat
paste a paper of choice from the kit - I used paper3
selection invert delete
select none delete the original
Place your tube
Now time to add our elements
I used the following:
Element 9
Element 17
Element 34
Element 35
Element 38
Element 40
Element 41
Element 47
Element 77
Element 79
Element 98
Element 100
Element 104
Element 106
Element 109
Merge your layers
Open paper of choice & apply mask
Place your name where you like it
Add the Copyright and your License Number for the tube
Resize to your liking and save as PNG
This tutorial was created on August 27,2016 by Rhonda
Any resemblance to another Tag or Tutorial is purely coincidental
This tutorial is written for those with knowledge of PSP
Supplies Needed:
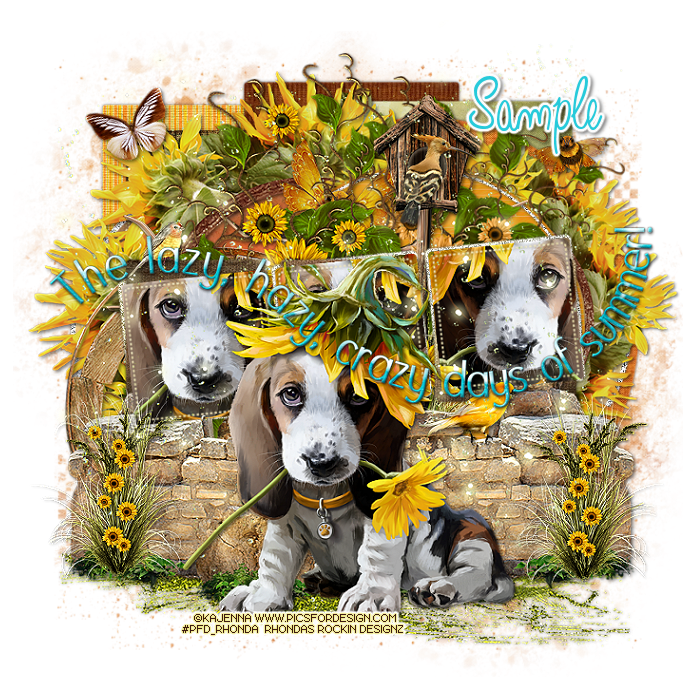
Tube of choice: I'm using the wonderful art work of Kajenna
You must obtain a license to use this art at PFD HERE
PTU Scrapkit from Kizzed by Kelz called "Sunflowers"
You can purchase this awesome kit at PFD HERE
Template #176 from Dee HERE
Mask of choice
Ok Lets get Started:
Open template - Shift D to duplicate then close out original
Canvas size 700x700
Delete copyright,bottom right yellow square, bottom orange square,left blue square
Click on top left blue square selections,select all, float,defloat
paste a paper of choice from the kit - I used paper24
selection invert delete
select none delete the original
Click on top orange square selections,select all, float,defloat
paste a paper of choice from the kit - I used paper26
selection invert delete
select none delete the original
Click on right blue square selections,select all, float,defloat
paste a paper of choice from the kit - I used paper34
selection invert delete
select none delete the original
Click on light blue circle selections,select all, float,defloat
paste a paper of choice from the kit - I used paper23
selection invert delete
select none delete the original
Click on yellow rectangle selections,select all, float,defloat
paste a paper of choice from the kit - I used paper22
selection invert delete
select none delete the original
White oval add noise x 2
Click on orange oval selections,select all, float,defloat
paste a paper of choice from the kit - I used paper38
selection invert delete
select none delete the original
Click on dotted rectangle selections,select all, float,defloat
paste a paper of choice from the kit - I used paper42
selection invert delete
select none delete the original
Click on yellow circle selections,select all, float,defloat
paste a paper of choice from the kit - I used paper25
selection invert delete
select none delete the original
White ring add noise x 2
Click on blue small squares selections,select all, float,defloat
paste a paper of choice from the kit - I used paper21
selection invert delete
select none delete the original
add noise
Click on white small squares selections,select all, float,defloat
paste a paper of choice from the kit - I used paper33
selection invert delete
select none delete the original
add noise
Click on light blue small squares selections,select all, float,defloat
add close-up of tube inside each square
selection invert delete
select none delete the original
Click on dotted small squares selections,select all, float,defloat
paste a paper of choice from the kit - I used paper13
selection invert delete
select none delete the original
Place your tube
Now time to add our elements
I used the following:
Element 22
Element 29
Element 30
Element 40
Element 45
Element 50
Element 53
Element 61
Element 69
Element 73
Element 92
Element 109
Element 111
Element 117
Element 119
Element 123
Element 125
Element 138
Word art of choice from template pack
Merge your layers
Open paper of choice & apply mask
Place your name where you like it
Add the Copyright and your License Number for the tube
Resize to your liking and save as PNG
This tutorial was created on August 27,2016 by Rhonda
Any resemblance to another Tag or Tutorial is purely coincidental
This tutorial is written for those with knowledge of PSP
Supplies Needed:
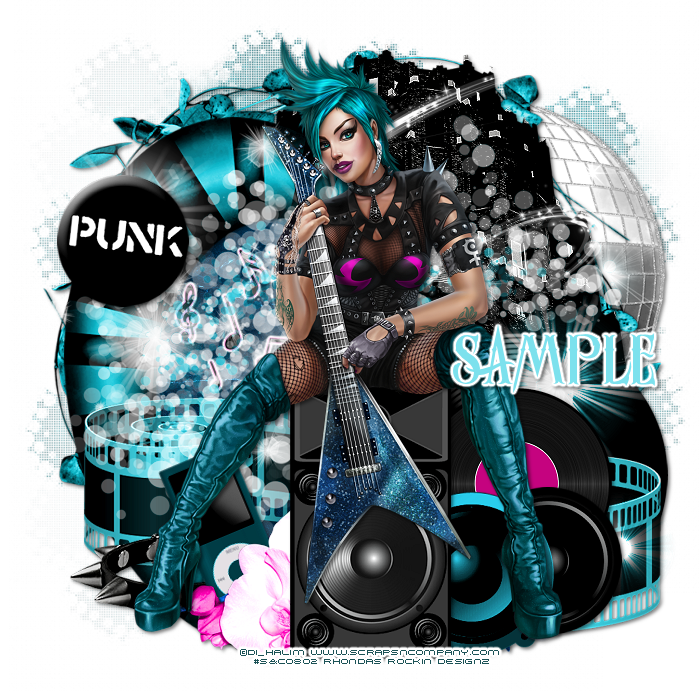
Tube of choice: I'm using the wonderful art work of Di_Halim
You must obtain a license to use this art at S&Co HERE
Kit can be purchased at S&CO HERE
Kit and tube match
Mask of choice
Ok Lets get Started:
Resize elements to your liking
This is a very quick and easy tutorial
Open blank canvas 700x700
Open frame 4 & place to left of tag
Grab the magic wand & click inside frame
Selections modify expand by 10
Open paper 11 and paste as new layer
Select None
Move paper under frame
Place your tube & build around it
See my tag for placements
Now time to add our elements
I used the following:
Badge
Ball
Bokeh
Collar 2
Film
House
LP,LP2,LP3
MP3
Notes 2
Sparkles 3&4
Speaker
Speaker 2&3
Wreath
Merge layers
Open paper 13 and apply mask
Place your name where you like it
Add the Copyright and your License Number for the tube
Resize to your liking and save as PNG
This tutorial was created on August 27,2016 by Rhonda
Any resemblance to another Tag or Tutorial is purely coincidental
Thursday, August 25, 2016
The members at TTL really spoil me with their talent
TY girls for trying my tutorials and making me tags!!!!!!!!!!!!


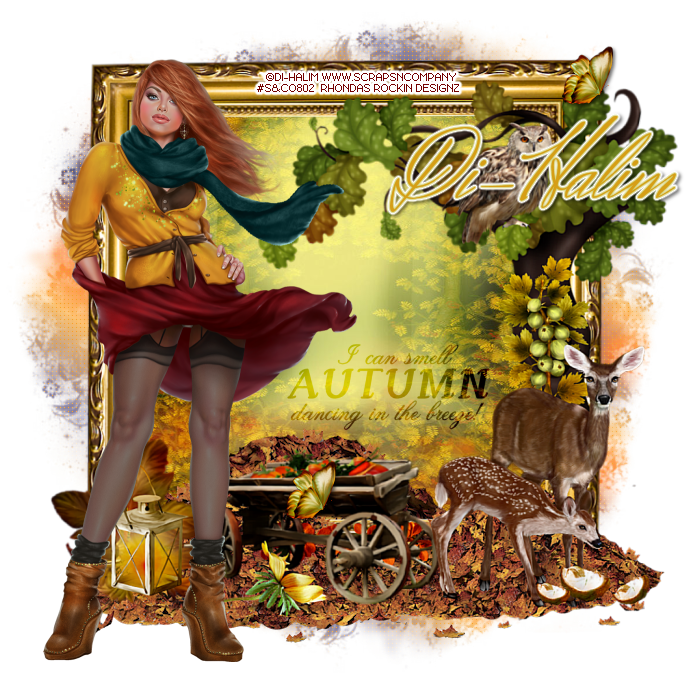
This tutorial is written for those with knowledge of PSP
Supplies Needed:
Tube of choice: I'm using the wonderful art work of Di-Halm
You can purchase these tubes at SNC HERE
PTU Scrap Kit and cluster by Danielae Design called "Great Autumn"
You can purchase this awesome kit & cluster at SNC HERE
You must purchase kit and cluster as 2 items
Mask of choice
Ok lets get started:
Open blank canvas 700x700
Open cluster 2 & place in center of canvas
Place your tube to right of cluster
Grab the selection tool and draw a rectangle around the frame
Add new layer under frame
Select all
Open paper of choice from kit
Paste into selections
Select none
Add any elements from kit to complete your tag
Merge layers and apply mask of choice
Open paper of choice and apply mask
Place your name where you like it
Add the Copyright and your License Number for the tube
Resize to your liking and save as PNG
This tutorial was created on August 25,2016 by Rhonda
Any resemblance to another Tag or Tutorial is purely coincidental

This tutorial is written for those with knowledge of PSP
Supplies Needed:
Tube of choice: Im using the wonderful art work of Souldesigner
You can purchase these tubes at PFD HERE
PTU Scrap Kit and cluster by Tiny Turtle Design called "Sweetheart"
You can purchase this awesome kit & cluster at her store HERE
You must purchase kit and cluster as 2 items
Mask of choice
Ok lets get started:
Open blank canvas 700x700
Open cluster 2 & place in center of canvas
Place your tube to right of cluster
Grab the selection tool and draw a rectangle around the frame
Add new layer under frame
Select all
Open paper of choice from kit
Paste into selections
Add any elements from kit to complete your tag
Merge layers and apply mask of choice
Open paper of choice and apply mask
Place your name where you like it
Add the Copyright and your License Number for the tube
Resize to your liking and save as PNG
This tutorial was created on August 25,2016 by Rhonda
Any resemblance to another Tag or Tutorial is purely coincidental
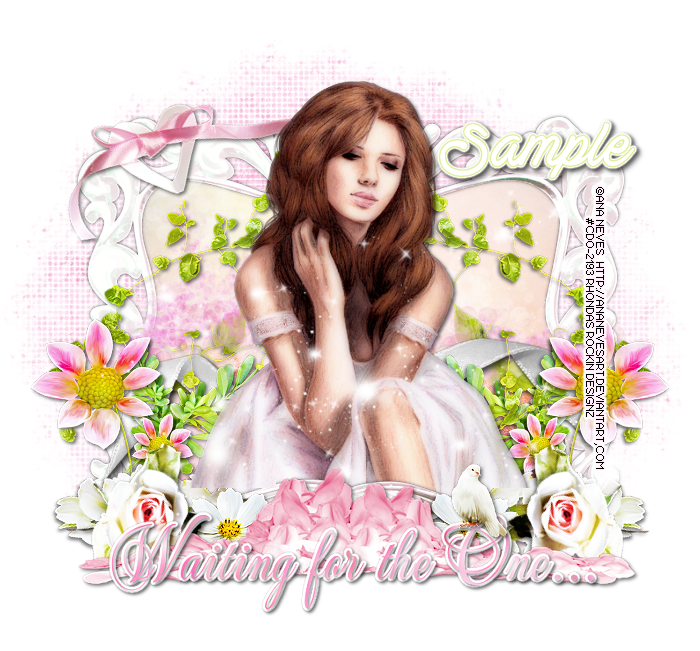
This tutorial is written for those with knowledge of PSP
Supplies Needed:
Tube of choice: I'm using the wonderful art work of Ana Neves
You must obtain a license to use at CDO HERE
PTU Scrapkit from Chichi Designz also purchased at CDO HERE
Kit and tube match
Mask of choice
Ok Lets get Started:
Resize elements to your liking
This is a very quick and easy tutorial
Open blank canvas 700x700
Open frame 4 & place in center of tag
Click inside frame with magic wand and expand by 10
Add new layer under frame and select all
Open paper 3 and paste into selection
Select none
Place your tube & build around it
Now time to add our elements
I used the following:
Bow
Branch
Brush
Dove
Flower
Flower 2
Flower Branch
Flowers
Leaves
Rose
Sparkles
Vines
Wordart
Merge layers and add mask of choice
Place your name where you like it
Add the Copyright and your License Number for the tube
Resize to your liking and save as PNG
This tutorial was created on August 25,2016 by Rhonda
Any resemblance to another Tag or Tutorial is purely coincidental
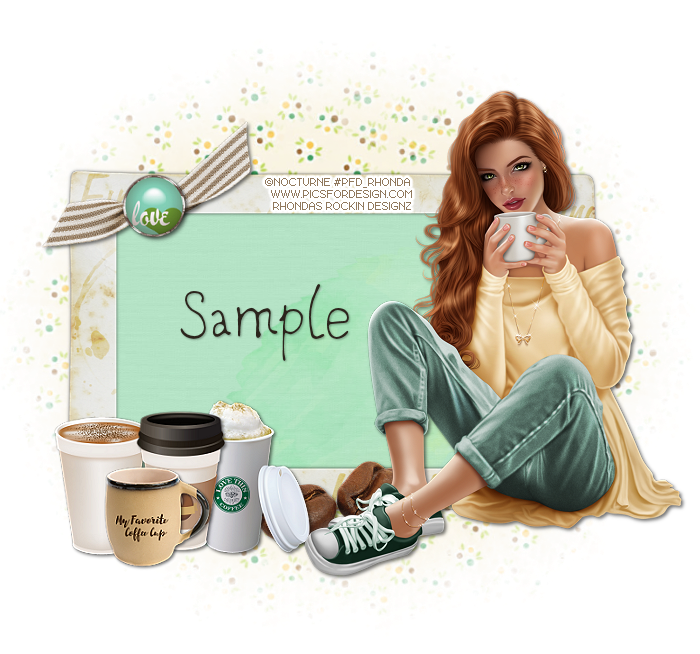
This tutorial is written for those with knowledge of PSP
Supplies Needed:
Tube of choice: I'm using the wonderful art work of Nocturne
You must obtain a license to use at PFD
FTU Scrapkit from Raspberry Road HERE
Look under freebies - Kit is called Coffee Break
You must register at store to download the freebies
Mask of choice
Ok Lets get Started:
Resize elements to your liking
This is a very quick and easy tutorial
Open blank canvas 700x700
Open element 12
Click inside with magic wand & expand by 10
Open paper 3 and paste as new layer
Selections invert delete
Move paper under frame
Place your main tube & build around it
Now time to add our elements
I used the following:
Element 2
Element 4
Element 6
Element 7
Element 10
Element 13
Element 19
Element 20
Merge layers
Open paper of choice and apply mask
Place your name where you like it
Add the Copyright and your License Number for the tube
Resize to your liking and save as PNG
This tutorial was created on August 25,2016 by Rhonda
Any resemblance to another Tag or Tutorial is purely coincidental
HERE
Friday, August 19, 2016
This tutorial is written for those with knowledge of PSP
Supplies Needed:
Tube of choice: I'm using the wonderful art work of VeryMany
Which you must obtain a license to use at their store HERE
You can purchase this kit ONLY from S&CO HERE
Template #826 by Millie HERE
Mask of choice
Ok Lets get Started:
Open template - Shift D to duplicate then close out original
Delete copyright & layers 8,9,10
Click on layer 1 selections,select all, float,defloat
paste a paper of choice from the kit - I used paper7
selection invert delete
select none delete the original
Click on layer 2 selections,select all, float,defloat
paste a paper of choice from the kit - I used paper9
selection invert delete
select none delete the original
Click on layer 3 selections,select all, float,defloat
paste a paper of choice from the kit - I used paper4
selection invert delete
select none delete the original
Click on layer 4 selections,select all, float,defloat
paste a paper of choice from the kit - I used paper5
selection invert delete
select none delete the original
Click on layer 5 selections,select all, float,defloat
add color of choice
selection invert delete
add noise with settings of choice
Click on layer 6 & add noise again
Click on layer 7 selections,select all, float,defloat
paste a paper of choice from the kit - I used paper8
selection invert delete
select none delete the original
Place your tube
Xero Radiance with settings of choice
Now time to add our elements
I used the following:
Element
Element 5
Element 15
Element 19
Element 21
Element 22
Element 37
Element 39
Element 40
Element 41
Element 42
Element 52
Element 55
Element 56
Element 58
Element 62
Element 63
Merge your layers
Open paper of choice and apply mask
Place your name where you like it
Add the Copyright and your License Number for the tube
Resize to your liking and save as PNG
This tutorial was created on August 20,2016 by Rhonda
Any resemblance to another Tag or Tutorial is purely coincidental
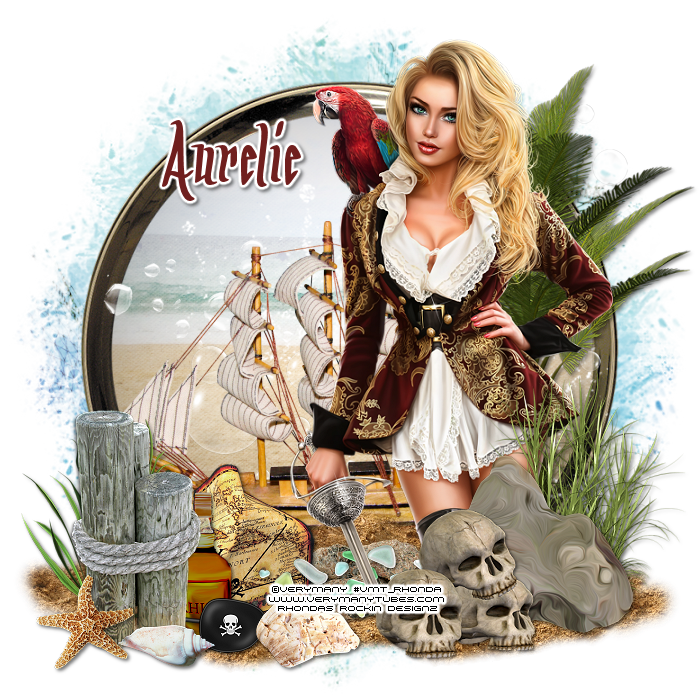
Tuesday, August 16, 2016
This tutorial is written for those with knowledge of PSP
Supplies Needed:
Tube of choice: I'm using the wonderful art work of VeryMany
You can purchase this tube at their store HERE
PTU Scrap Kit by Purple Dream Scraps called Pirate Cove
You can purchase this awesome kit HERE
Mask of choice
Ok Lets get Started:
Open a blank image 700x700
Open element 57 from kit and place as a new image
Grab the magik wand and click inside frame
Select modify expand by 10
Open paper 7 from kit and place as a new layer
Selections invert - delete
Move paper under frame and merge together
Place your tube at build around it
Now add any elements of choice
I used the following:
Element 1
Element 2
Element 5
Element 13
Element 16
Element 17
Element 18
Element 23
Element 32
Element 33
Element 38
Element 39
Element 40
Element 43
Element 44
Element 50
Element 53
Merge your layers
Open paper of choice and apply mask
Place your name where you like it
Add the Copyright and your License Number for the tube
Resize to your liking and save as PNG
This tutorial was created on August 16,2016 by Rhonda
Any resemblance to another Tag or Tutorial is purely coincidental

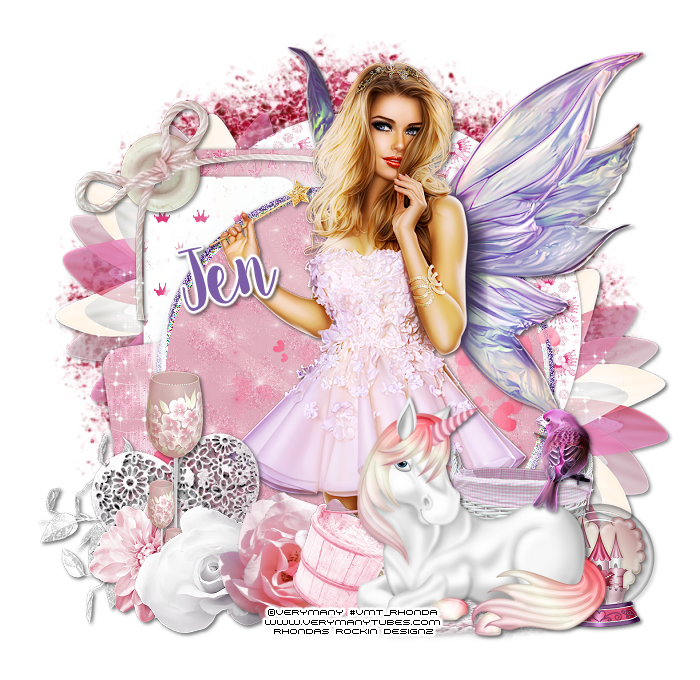
This tutorial is written for those with knowledge of PSP
Supplies Needed:
Tube of choice: I'm using the wonderful art work of VeryMany
You must obtain a license to use from their store HERE
PTU Scrapkit from Jens Sweet Temptations called Magical Sparkles Fairy
Kit can be purchased ONLY at S&CO HERE
Mask of choice
Ok Lets get Started:
Resize elements to your liking
This is a very quick and easy tutorial
Open blank canvas 700x700
Open element 51 and place in center
Click inside frame with magik wand
Selections modify expand by 10
Add new layer under frame and select all
Open paper 6 and paste into selections
Select none
Place your tube & build around it
Now time to add our elements
I used the following:
Element 2
Element 7
Element 10
Element 21
Element 22
Element 24
Element 26
Element 34
Element 42
Element 43
Element 45
Element 67
Element 70
Merge layers
Open paper of choice and apply mask
Place your name where you like it
Add the Copyright and your License Number for the tube
Resize to your liking and save as PNG
This tutorial was created on August 16,2016 by Rhonda
Any resemblance to another Tag or Tutorial is purely coincidental
Thursday, August 11, 2016
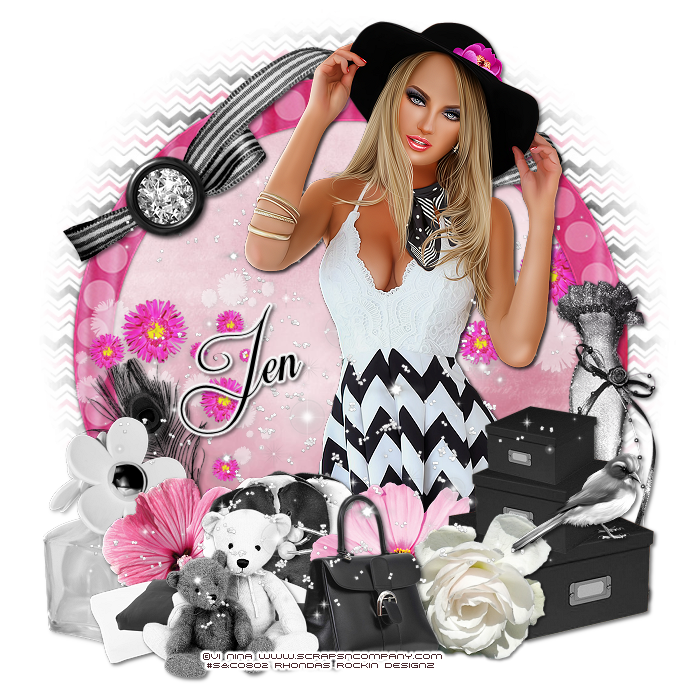
This tutorial is written for those with knowledge of PSP
Supplies Needed:
Tube of choice: I'm using the wonderful art work of Vi Nina
You must obtain a license to use from S&CO HERE
PTU Scrapkit from Jens Sweet Temptations that can be purchased ONLY at S&CO HERE
Mask of choice
Ok Lets get Started:
Resize elements to your liking
This is a very quick and easy tutorial
Open blank canvas 700x700
Open element 17 and place in center
Click inside frame with magik wand
Selections modify expand by 10
Add new layer under frame and select all
Open paper 7 and paste into selections
Select none
Place your tube & build around it
Now time to add our elements
I used the following:
Elements 3
Elements 6
Elements 7
Elements 15
Elements 19
Elements 23
Elements 24
Elements 33
Elements 36
Elements 37
Elements 39
Elements 42
Elements 44
Elements 49
Elements 58
Elements 59
Merge layers
Open paper of choice and apply mask
Place your name where you like it
Add the Copyright and your License Number for the tube
Resize to your liking and save as PNG
This tutorial was created on August 11,2016 by Rhonda
Any resemblance to another Tag or Tutorial is purely coincidental

This tutorial is written for those with knowledge of PSP
Supplies Needed:
Tube of choice: I'm using the wonderful art work of Celineart Pinup
You must obtain a license to use from Hannia's Design HERE
PTU Scrapkit from Purple Dreams Scraps that can be purchased HERE
Mask of choice
Ok Lets get Started:
Resize elements to your liking
This is a very quick and easy tutorial
Open blank canvas 700x700
Open element 63 and place in center
Click inside frame with magik wand
Selections modify expand by 10
Add new layer under frame and select all
Open paper 13 and paste into selections
Select none
Place your tube & build around it
Now time to add our elements
I used the following:
Elements 1
Elements 4
Elements 8
Elements 10
Elements 11
Elements 12
Elements 15
Elements 19
Elements 28
Elements 37
Elements 38
Elements 39
Elements 40
Elements 42
Elements 44
Elements 49
Elements 55
Elements 56
Elements 60
Elements 65
Merge layers
Open paper of choice and apply mask
Place your name where you like it
Add the Copyright and your License Number for the tube
Resize to your liking and save as PNG
This tutorial was created on August 11,2016 by Rhonda
Any resemblance to another Tag or Tutorial is purely coincidental
Tuesday, August 9, 2016
This tutorial is written for those with knowledge of PSP
Supplies Needed:
Tube of choice: Im using the wonderful art work of Swan Scraps
You can purchase his work at S&CO HERE
PTU Scrap Kit by Jen from Sweet Temptations called "Mz Frankie"
You an purchase this awesome kit ONLY at S&CO HERE
Template #387 by Missyl HERE
Mask of choice
Ok Lets get Started:
Open template - Shift D to duplicate then close out original
Canvas size 700x700
Delete copyright, word art, dotted rectangle and circles,thin rectangle,circle
I rearranged some layers and reduced sizes of frames
Click on small circles selections,select all, float,defloat
paste a paper of choice from the kit - I used paper1
selection invert delete
select none delete the original
Click on rectangle selections,select all, float,defloat
paste a paper of choice from the kit - I used paper4
selection invert delete
select none delete the original
Add more noise to circle back
Click on circle 2 selections,select all, float,defloat
paste a color of choice then apply Xero Fritillary
selection invert delete
select none delete the original
Click on frames selections,select all, float,defloat
paste a paper of choice from the kit - I used paper5
selection invert delete
select none delete the original
Add close-up of tube inside frame
Add more noise to frame backs
Place your tube
Now time to add our elements
I used the following:
Element 5
Element 8
Element 11
Element 17
Element 27
Element 33
Element 34
Element 38
Element 39
Element 44
Element 45
Element 46
Element 49
Element 50
Element 55
Element 56
Element 60
Merge your layers
Open paper of choice & apply mask of choice
Place your name where you like it
Add the Copyright and your License Number for the tube
Resize to your liking and save as PNG
This tutorial was created on August 9,2016 by Rhonda
Any resemblance to another Tag or Tutorial is purely coincidental

This tutorial is written for those with knowledge of PSP
Supplies Needed:
Tube of choice: I'm using the wonderful art work of VeryMany
You can purchase this tube at their store HERE
PTU Scrap Kit by Purple Dream Scraps called Lovely Spring
You can purchase this awesome kit HERE
Template #49 by Fired by Flamin HERE
Mask of choice
Ok Lets get Started:
Open template - Shift D to duplicate then close out original
Delete copyright, word art & sun
Click on oval 1 selections,select all, float,defloat
paste a paper of choice from the kit - I used paper5
selection invert delete
select none delete the original
Click on red rectangle selections,select all, float,defloat
paste a paper of choice from the kit - I used paper4
selection invert delete
select none delete the original
Click on oval 2 selections,select all, float,defloat
paste a paper of choice from the kit - I used paper1
selection invert delete
select none delete the original
Click on orange square 1 selections,select all, float,defloat
paste a close-up of tube inside square
selection invert delete
select none delete the original
Change blend mode to Luminace
Add border with noise
Click on orange square 2 selections,select all, float,defloat
paste a paper of choice from the kit - I used paper2
selection invert delete
select none delete the original
Click on orange square 3 selections,select all, float,defloat
paste a paper of choice from the kit - I used paper9
selection invert delete
select none delete the original
Place your tube
Now time to add our elements
I used the following:
Element 5
Element 13
Element 14
Element 15
Element 17
Element 18
Element 19
Element 23
Element 32
Element 37
Element 38
Element 42
Element 48
Element 51
Element 53
Merge your layers
Open paper of choice and apply mask of choice
Place your name where you like it
Add the Copyright and your License Number for the tube
Resize to your liking and save as PNG
This tutorial was created on August 9,2016 by Rhonda

This tutorial is written for those with knowledge of PSP
Supplies Needed:
Tube of choice: I'm using the wonderful art work of Elias Chatzoudis
I purchased the tube from CDO HERE
Matching Scrapkit by Tasha's Playground at CDO HERE
Template #23 by Created by Crys HERE
Mask of choice
Ok Lets get Started:
Open template - Shift D to duplicate then close out original
Canvas size 700x700
Deleted copyright, word art, layers 6&7
Click on layer 1 selections,select all, float,defloat
paste a paper of choice from the kit - I used paper3
selection invert delete
select none delete the original
Click on layer 2 selections,select all, float,defloat
paste a paper of choice from the kit - I used paper5
selection invert delete
select none delete the original
Click on layer 3 selections,select all, float,defloat
paste a paper of choice from the kit - I used paper5
selection invert delete
select none delete the original
Click on layer 4 selections,select all, float,defloat
paste a paper of choice from the kit - I used paper2
selection invert delete
select none delete the original
Click on layer 5 selections,select all, float,defloat
paste a paper of choice from the kit - I used paper1
selection invert delete
select none delete the original
Place your tube to right of tag
Now time to add our elements
I used the following:
Element 4
Element 5
Element 6
Element 9
Element 10
Element 14
Element 21
Merge your layers
Open paper of choice and apply mask
Place your name where you like it
Add the Copyright and your License Number for the tube
Resize to your liking and save as PNG
This tutorial was created on August 9,2016 by Rhonda
Any resemblance to another Tag or Tutorial is purely coincidental
Friday, August 5, 2016


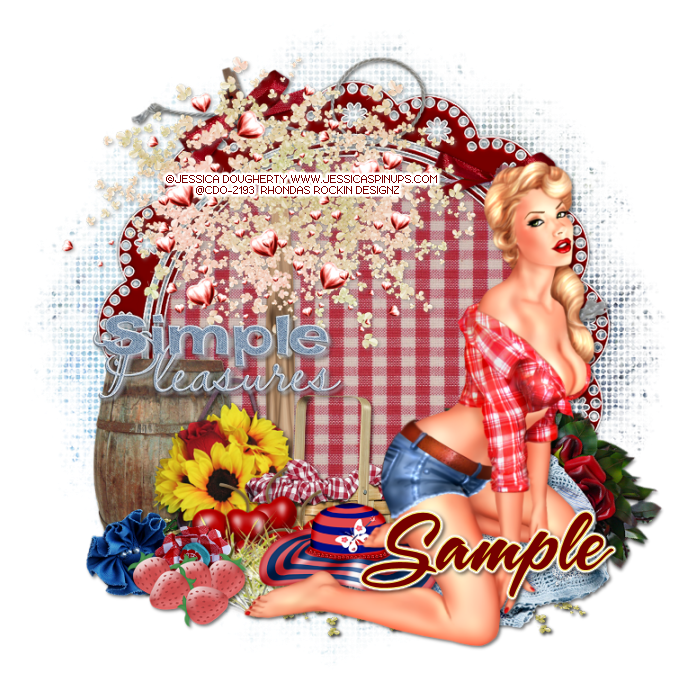
This tutorial is written for those with knowledge of PSP
Supplies Needed:
Tube of choice: Im using the wonderful art work of Jessica Dougherty
You must obtain a license to use at CDO HERE
PTU Scrapkit from Ladyhawk Designs purchased at CDO HERE
Kit and tube match
Mask of choice
Ok Lets get Started:
Resize elements to your liking
This is a very quick and easy tutorial
Open blank canvas 700x700
Open frame 1 & place in center of tag
Click inside frame with magic wand and expand by 10
Add new layer under frame and select all
Open paper 1 and paste into selection
Select none
Place tube to right hand side
Now time to add our elements
I used the following:
Element 3
Element 8
Element 9
Element 11
Element 17
Element 18
Element 19
Element 20
Element 23
Element 24
Element 25
Element 27
Element 28
Element 29
Element 30
Merge layers
Add paper and mask of choice
Place your name where you like it
Add the Copyright and your License Number for the tube
Resize to your liking and save as PNG
This tutorial was created on August 5,2016 by Rhonda
Any resemblance to another Tag or Tutorial is purely coincidental
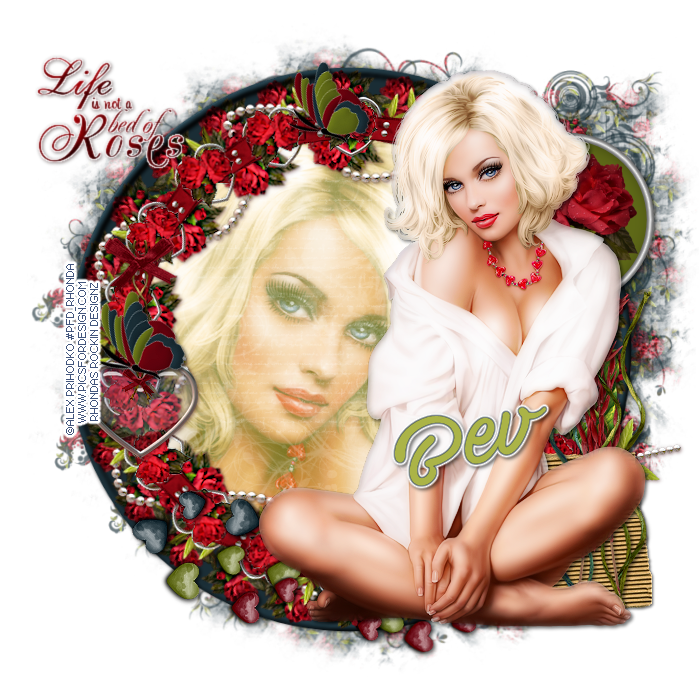
This tutorial is written for those with knowledge of PSP
Supplies Needed:
Tube of choice: I'm using the wonderful art work of Alex Prihodko
You can purchase his tubes at PFD HERE
FTU scrapkit by Designs by Vaybs HERE
Free matching cluster by Bev found at TTL blog HERE
Mask #1 by Rachel Designs HERE
Please leave some love when you download
Resize elements to your liking & add dropshadow
Ok Lets get Started:
Open cluster frame and place in center
Using selection tool draw around frame
Add new layer under frame
Open paper 9 and paste into selection
Place your tube to right of cluster
Open close-up of tube to inside of left cluster
Change blend mode to screen
Apply Xero Radiance with settings of choice to both tubes
Now add any other elements of choice
I used the following:
Butterfly 1&3
Button 2
Cardboard
Frame 4
Heartline 1,2&3
Rose
Straw 2&3
Merge your layers
Open paper of choice and apply mask
Place your name where you like it
Add the Copyright and your License Number for the tube
Resize to your liking and save as PNG
This tutorial was created on August 5,2016 by Rhonda
Any resemblance to another Tag or Tutorial is purely coincidental
Subscribe to:
Posts
(Atom)
Grab My Blinkie

I CT For


Blogs I Visit


