Saturday, April 23, 2016
This tutorial is written for those with knowledge of PSP
Supplies Needed:
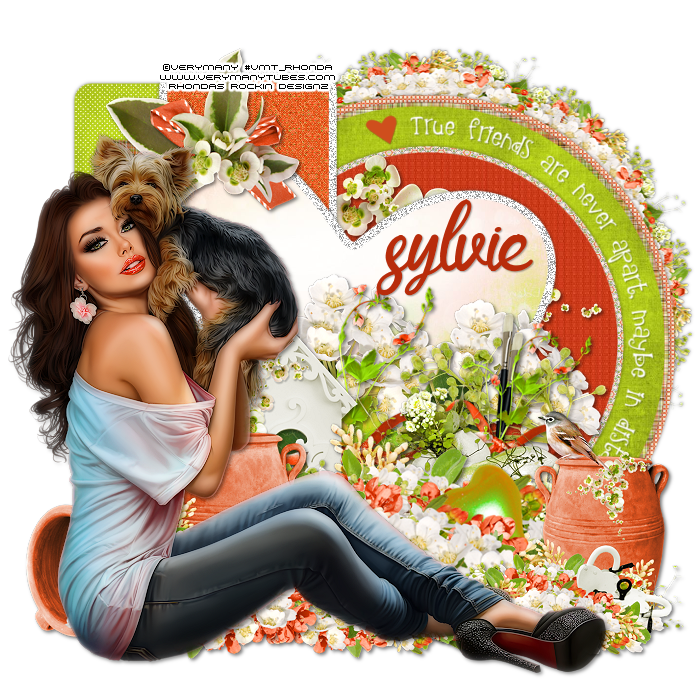
Tube of choice: I'm using the wonderful art work of VeryMany
You can purchase their art HERE
PTU Scrapkit by Dees Design called Amongst Friends
Kit can be purchased at DeesSign Depot HERE
Collab Template by Dee and Sylvie HERE
Ok Lets get Started:
Open template - Shift D to duplicate then close out original
Resize template to your liking
Deleted copyright, blue top and bottom squares & dotted outline
Click on green circle selections,select all, float,defloat
paste a paper of choice from the kit - I used paper6
selection invert delete
select none delete the original
Click on large white circle selections,select all, float,defloat
paste a paper of choice from the kit - I used paper3
selection invert delete
select none delete the original
Click on pink circle selections,select all, float,defloat
paste a paper of choice from the kit - I used paper11
selection invert delete
select none delete the original
Click on small white circle selections,select all, float,defloat
paste a paper of choice from the kit - I used paper10
selection invert delete
select none delete the original
Click on yellow circle selections,select all, float,defloat
paste a paper of choice from the kit - I used paper7
selection invert delete
select none delete the original
Click on green rectangle selections,select all, float,defloat
paste a paper of choice from the kit - I used paper12
selection invert delete
select none delete the original
Add noise to the 3 white squares
Click on pink,blue and yellow squares selections,select all, float,defloat
paste a paper of choice from the kit - I used paper1
selection invert delete
select none delete the original
Add noise to white heart
Click on pink heart selections,select all, float,defloat
paste a paper of choice from the kit - I used paper15
selection invert delete
select none delete the original
Click on small hearts selections,select all, float,defloat
Add new layer and flood fill with solid color of choice
select none delete the original
Place your tube
Xero Porcelin with settings of choice
Now time to add our elements
I used the following:
Element 2c
Element 17
Element 31
Element 45b
Element 46
Element 48c
Element 49b
Element 58b
Element 58c
Element 65
Element 90
Element 91b
Element 97
Place your name where you like it
Add the Copyright and your License Number for the tube
Resize to your liking and save as PNG
This tutorial was created on April 23,2016 by Rhonda
Any resemblance to another Tag or Tutorial is purely coincidental

Subscribe to:
Post Comments
(Atom)
Grab My Blinkie

I CT For


Blogs I Visit


Wooohooo the link you left me didn't work! But i found it!! Thank you so much for using the collaborations in your tutorial, LOVE the tag and so grateful you tut'd it thank youuU! ♥
ReplyDelete