Monday, December 5, 2016

This tutorial is written for those with knowledge of PSP
Supplies Needed:
Tube of choice: I'm using the wonderful art work of Stan_ Dudin
Which you must obtain a license to use from S&CO HERE
PTU Scrap Kit by Jen from Sweet Temptations HERE
Mask of choice
Don't forget to leave a thank you when downloading
Lets get Started:
Open element 66 from kit and place to center - Resize if needed
Open element 22 and place on top of first frame
Click inside frame - Select modify expand by 12
Create new layer and place under frame
Open paper 2 and place into selection
Select none
Merge these as 1 layer
Place tube of choice in center of frame
Now time to add our elements
I used the following:
Element 6
Element 8
Element 9
Element 27
Element 28
Element 30
Element 33
Element 34
Element 38
Element 39
Element 43
Element 47
Element 51
Element 55
Element 56
Element 59
Element 61
Merge your layers
Open paper 2 & apply mask
Place your name where you like it
Add the Copyright and your License Number for the tube
Resize to your liking and save as PNG
This tutorial was created on December 5,2016 by Rhonda
Any resemblance to another Tag or Tutorial is purely coincidental

Friday, December 2, 2016

This tutorial is written for those with knowledge of PSP
Supplies Needed:
Tube of choice: I'm using the wonderful art work of Oky Draft
Which you must obtain a license to use from S&CO HERE
Matching PTU Scrap Kit by Jen from Sweet Temptations HERE
Template #1 by Millie HERE
Mask of choice
Don't forget to leave a thank you when downloading
Lets get Started:
Open template - Shift D to duplicate then close out original
Increase canvas size 700x700 (or size of your choosing)
Delete copyright & word art
Click on raster 1 selections,select all, float,defloat
leave selected and add new layer
open paper 3 and paste into selection
select none
Click on raster 2 selections,select all, float,defloat
leave selected and add new layer
open paper 2 and paste into selection
select none
Click on raster 3 selections,select all, float,defloat
paste a paper of choice from the kit - I used paper7
selection invert delete
select none delete the original
Click on raster 4 selections,select all, float,defloat
leave selected and add new layer
open paper 8 and paste into selection
select none
Click on raster 5 selections,select all, float,defloat
leave selected and add new layer
open paper 6 and paste into selection
select none
add noise with settings of choice
Place your tube
Now time to add our elements
I used the following:
Element 4
Element 7
Element 9
Element 12
Element 25
Element 26
Element 27
Element 29
Element 32
Element 37
Element 40
Element 41
Element 44
Element 45
Element 46
Element 47
Element 48
Element 49
Merge your layers
Open paper 2 & apply mask
Place your name where you like it
Add the Copyright and your License Number for the tube
Resize to your liking and save as PNG
This tutorial was created on December 2,2016 by Rhonda
Any resemblance to another Tag or Tutorial is purely coincidental
Thursday, December 1, 2016
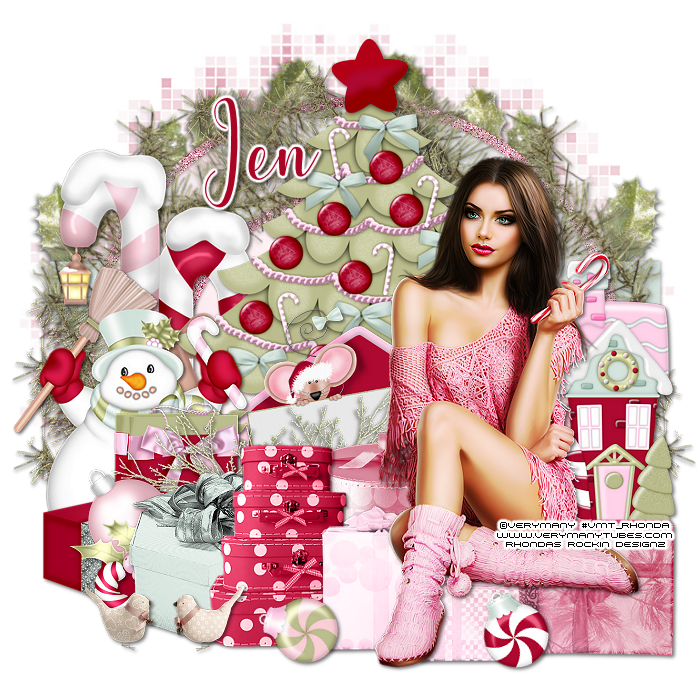
This tutorial is written for those with knowledge of PSP
Supplies Needed:
Tube of choice: I'm using the wonderful art work of VeryMany
Which you must obtain a license to use from their store HERE
PTU Scrap Kit by Jen from Sweet Temptations HERE
Template # by Melissaz Creationz HERE
Mask of choice
Don't forget to leave a thank you when downloading
Lets get Started:
Open template - Shift D to duplicate then close out original
Canvas size 700x700 (or size of your choosing)
Delete copyright, layer 4 and copy of 4
I moved my rectangle bars behind the circles
Click on copy of raster 5 selections,select all, float,defloat
paste a paper of choice from the kit - I used paper3
selection invert delete
select none delete the original
Click on raster 6 selections,select all, float,defloat
paste a paper of choice from the kit - I used paper2
selection invert delete
select none delete the original
Click on raster 5 selections,select all, float,defloat
paste a paper of choice from the kit - I used paper1
selection invert delete
select none delete the original
Click on raster 7 selections,select all, float,defloat
leave selected and add new layer
open paper 10 and paste into selection
select none
Click on raster 8 selections,select all, float,defloat
leave selected and add new layer
open paper 5 and paste into selection
select none
add noise with settings of choice
Click on raster 2 selections,select all, float,defloat
leave selected and add new layer
open paper 4 and paste into selection
select none
Click on raster 3 selections,select all, float,defloat
leave selected and add new layer
open paper 5 and paste into selection
select none
add noise with settings of choice
Place your main tube
Xero Radiance with settings of choice
Now time to add our elements
I used the following:
Element 3
Element 5
Element 7
Element 14
Element 15
Element 18
Element 22
Element 23
Element 27
Element 30
Element 39
Element 41
Element 42
Element 44
Element 47
Element 55
Element 56
Element 57
Merge your layers
Open paper 5 & apply mask
Place your name where you like it
Add the Copyright and your License Number for the tube
Resize to your liking and save as PNG
This tutorial was created on December 1,2016 by Rhonda
Any resemblance to another Tag or Tutorial is purely coincidental
Tuesday, November 22, 2016
This tutorial is written for those with knowledge of PSP
Supplies Needed:
Tube of choice: I'm using the wonderful art work of Caron Ninson
You must obtain a license to use this art HERE
FTU cluster by Mary Jane found at Artistic Tag Passion HERE
Mask of choice
Ok Lets get Started:
Open frame - Shift D to duplicate and close original
Delete copyright
Grab freehand tool and draw around the frame
Add new layer under frame
Open paper 1 & paste into selection
Place your tube
Now time to add our elements
I used the following:
Basket of Apples
Bird
Birdhouse 2
Pinecone
Spray 1,2,5&6
Wagon 2
Merge your layers
Open paper of choice & apply mask
Place your name where you like it
Add the Copyright and your License Number for the tube
Resize to your liking and save as PNG
This tutorial was created on November 22,2016 by Rhonda

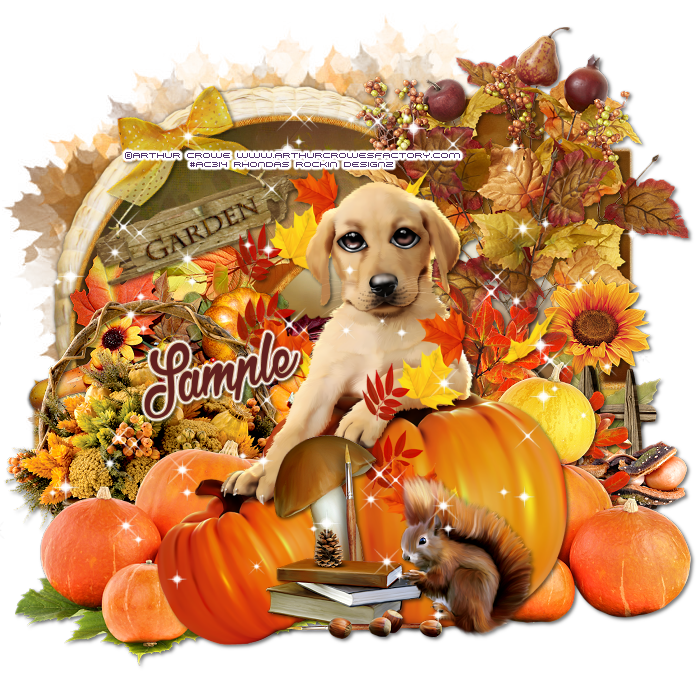
This tutorial is written for those with knowledge of PSP
Supplies Needed:
Tube of choice: I'm using the wonderful art work of Arthur Crowe
You must obtain a license to use at his store HERE
PTU Scrapkit by Creations by Sandi called Sweet Doggy
Buy as a bundle at Crowe's Store HERE
Template #25 by Just Like Candy Designs HERE
Mask of choice
Ok Lets get Started:
Open template - Shift D to duplicate then close out original
Decrease tamplate all layers 86%
Increase canvas size to 700x700
Delete copyright, right upper brown,left peach circle & right light brown
Move left vertical rectangle to right hand side
Click on left vertical rectangle selections,select all, float,defloat
paste a paper of choice from the kit - I used paper2
selection invert delete
select none delete the original
Click on middle rectangle selections,select all, float,defloat
paste a paper of choice from the kit - I used paper12
selection invert delete
select none delete the original
Click on center light brown selections,select all, float,defloat
paste a paper of choice from the kit - I used paper8
selection invert delete
select none delete the original
Place tube where desired
Now time to add our elements
I used the following:
Element 4
Element 5
Element 7
Element 11
Element 16
Element 17
Element 18
Element 25
Element 30
Element 33
Element 39
Element 43
Element 47
Element 50
Element 55
Element 57
Merge your layers
Open paper of choice and apply mask
Place your name where you like it
Add the Copyright and your License Number for the tube
Resize to your liking and save as PNG
This tutorial was created on November 22,2016 by Rhonda
Any resemblance to another Tag or Tutorial is purely coincidental
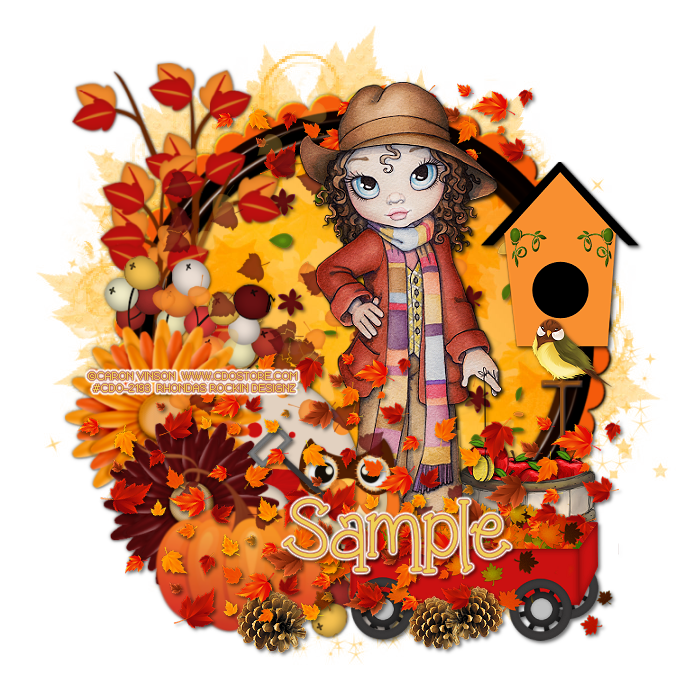
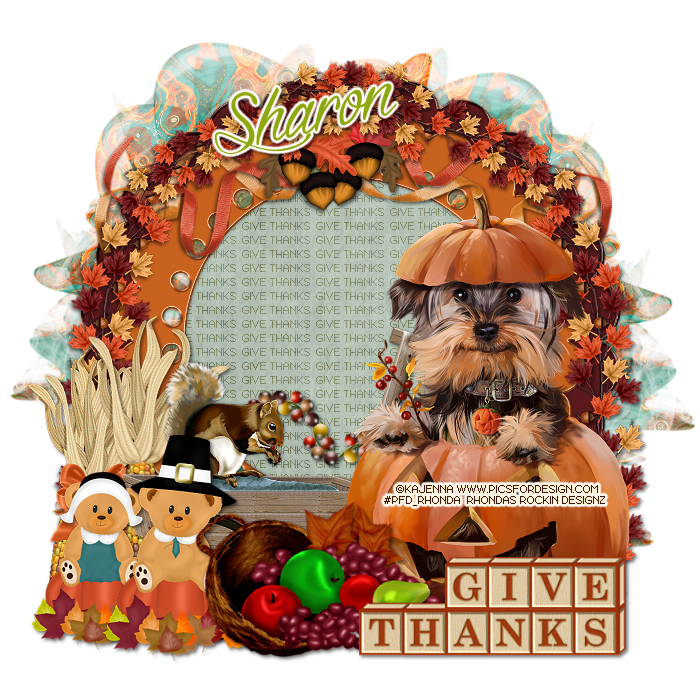
Monday, November 7, 2016

This tutorial is written for those with knowledge of PSP
Supplies Needed:
Tube of choice: I'm using the wonderful art work of Kajenna
You must obtain a license to use at PFD HERE
PTU Scrapkit by Design by Joan called Fabulous Fall HERE
Template #2 by Ruby & Barbara HERE
Mask of choice
Ok Lets get Started:
Open template - Shift D to duplicate then close out original
Decrease template all layers 90%
Increase canvas size to 700x700
Delete copyright, leaf frames,fall shapes & small text
Click on curl shape selections,select all, float,defloat
paste a paper of choice from the kit - I used paper8
selection invert delete
select none delete the original
Click on curl frame selections,select all, float,defloat
paste a paper of choice from the kit - I used paper5
selection invert delete
select none delete the original
Click on top & bottom bar selections,select all, float,defloat
paste a paper of choice from the kit - I used paper3
selection invert delete
select none delete the original
Click on rect 1&2 selections,select all, float,defloat
paste a paper of choice from the kit - I used paper2
selection invert delete
select none delete the original
add noise with settings of choice
Click on rect 3 selections,select all, float,defloat
paste a paper of choice from the kit - I used paper9
selection invert delete
select none delete the original
Click on all frames selections,select all, float,defloat
paste a paper of choice from the kit - I used paper7
selection invert delete
select none delete the original
add noise with settings of choice
Place tube where desired
Now time to add our elements
I used the following:
Element 1
Element 3
Element 6
Element 11
Element 20
Element 21
Element 22
Element 25
Element 26
Element 28
Element 32
Element 33
Element 35
Element 37
Element 39
Element 43
Element 44
Element 45
Element 50
Element 52
Element 60
Element 65
Element 66
Element 67
Element 69
Merge your layers
Open paper of choice and apply mask
Place your name where you like it
Add the Copyright and your License Number for the tube
Resize to your liking and save as PNG
This tutorial was created on November 7,2016 by Rhonda
Any resemblance to another Tag or Tutorial is purely coincidental

This tutorial is written for those with knowledge of PSP
Supplies Needed:
Tube of choice: I'm using the wonderful art work of Ismael Rac
This tube was purchased at his store when open
You can purchase these tubes now at S&CO HERE
PTU Scrapkit by Graphics of Fantasy called Thanksgiving
You can purchase this kit from PFD HERE
Template by Chantal's Corner HERE
Mask of choice
Don't forget to leave a thank you when downloading
Ok Lets get Started:
Open template - Shift D to duplicate then close out original
Delete copyright, raster 8 and dotted lines
Click on raster 7 selections,select all, float,defloat
paste a paper of choice from the kit - I used paper1
selection invert delete
select none delete the original
Click on raster 3 selections,select all, float,defloat
paste a paper of choice from the kit - I used paper6
selection invert delete
select none delete the original
Click on raster 6 selections,select all, float,defloat
paste a paper of choice from the kit - I used paper3
selection invert delete
select none delete the original
Click on raster 5 selections,select all, float,defloat
paste a paper of choice from the kit - I used paper7
selection invert delete
select none delete the original
Click on raster 4 selections,select all, float,defloat
paste a paper of choice from the kit - I used paper5
selection invert delete
select none delete the original
Move word art around if needed
Place tube where desired
Now time to add our elements
I used the following:
Element 18
Element 26
Element 28
Element 29
Element 35
Element 39
Element 40
Element 45
Element 47
Element 56
Element 57
Element 66
Element 76
Element 85
Element 106
Element 112
Merge your layers
Open paper of choice & apply mask
Place your name where you like it
Add the Copyright and your License Number for the tube
Resize to your liking and save as PNG
This tutorial was created on November 6,2016 by Rhonda
Any resemblance to another Tag or Tutorial is purely coincidental
Saturday, November 5, 2016
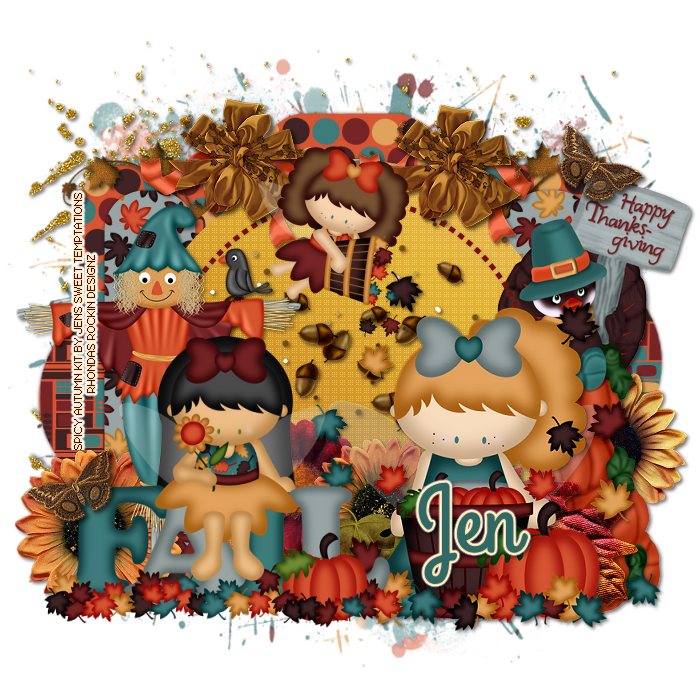
This tutorial is written for those with knowledge of PSP
Supplies Needed:
No tube used - Used fairies in kit
FTU Scrapkit by Jen from Sweet Temptations HERE
Shades of Autumn Template byFired by Flamin HERE
Mask of choice
Don't forget to leave a thank you when downloading
Ok Lets get Started:
Open template - Shift D to duplicate then close out original
Delete copyright and word art
Click on the 3 orange rectangles selections,select all, float,defloat
paste a paper of choice from the kit - I used paper7
selection invert delete
select none delete the original
Click on oval selections,select all, float,defloat
paste a paper of choice from the kit - I used paper6
selection invert delete
select none delete the original
Click on yellow circle selections,select all, float,defloat
paste a paper of choice from the kit - I used paper8
selection invert delete
select none delete the original
Click on the brown rectangles selections,select all, float,defloat
paste a paper of choice from the kit - I used paper1
selection invert delete
select none delete the original
Click on orange circle selections,select all, float,defloat
add new layer and apply fall gradient of choice
selection invert delete
select none delete the original
apply Penta Dot and Cross with settings of choice
Now time to add our elements
I used the following:
Acorn Splat
Butterfly
Bow
Doodle
Fairy 2,3&4
Flower 1,2&4
Glitter
Happy Thanksgiving
Leaf 2&5
Ribbon
Scarecrow
Merge your layers
Open paper of choice & apply mask
Place your name where you like it
Add the Copyright and your License Number for the tube
Resize to your liking and save as PNG
This tutorial was created on November 4,2016 by Rhonda
Any resemblance to another Tag or Tutorial is purely coincidental
Thursday, November 3, 2016
This tutorial is written for those with knowledge of PSP
Supplies Needed:
Tube of choice: I'm using the wonderful art work of Kajenna
You can purchase these tubes at PFD HERE
FTU kit by Sharon from Myztic Designzz HERE
Mask from Zombie Graphics HERE
This is a very simple and easy tut
Just place your elements where you want them
Ok Lets get Started:
Open blank canvas 700x700
Open frame 4, resize 110% & place as a new layer
Open frame 3 & place on top of other frame
Click inside frame with magic wand
Selection modify expand by 10
Open paper 6 & place as a new layer
Selections invert delete
Move paper under frame
I used a pixel font and wrote Give Thanks in my circle
Choose writing of your choice
Change blend mode to overlay
Place tube to right of tag
Add elements around the tube
I used the following:
Acorns
Autumn Branch
Cart
Fruit Basket
Give Thanks
Indian Corn 1&2
Heart Wreath
Pilgrim Boy and Girl
Ribbin 3&4
Squirrel
Merge your layers
Open paper of choice and apply mask
Place your name where you like it
Add the Copyright and your License Number for the tube
Resize to your liking and save as PNG
This tutorial was created on November 4,2016 by Rhonda
Any resemblance to another Tag or Tutorial is purely coincidental

This tutorial is written for those with knowledge of PSP
Supplies Needed:
Tube of choice: I'm using the wonderful art work of Jennifer Janesko
Which you must obtain a license to use at CDO HERE
PTU Scrap Kit by Jen from Sweet Temptations called "Autumn is Here"
You can purchase this awesome kit ONLY from SNCO HERE
Collab Template #2 by Tamie & Deb HERE
Wordart by Dee HERE
Ok Lets get Started:
Open template - Shift D to duplicate then close out original
Resize image to your liking
Delete copyright
Click on raster 3 selections,select all, float,defloat
paste a paper of choice from the kit - I used paper7
selection invert delete
select none delete the original
add border with noise
Click on copy of raster 3 selections,select all, float,defloat
paste a paper of choice from the kit - I used paper1
selection invert delete
select none delete the original
Click on raster 6 selections,select all, float,defloat
paste a paper of choice from the kit - I used paper5
selection invert delete
select none delete the original
Click on raster 2 selections,select all, float,defloat
paste a paper of choice from the kit - I used paper8
selection invert delete
select none delete the original
Click on raster 10 selections,select all, float,defloat
paste a paper of choice from the kit - I used paper1
selection invert delete
select none delete the original
Click on raster 4 selections,select all, float,defloat
paste a paper of choice from the kit - I used paper5
selection invert delete
select none delete the original
Click on raster 9 selections,select all, float,defloat
paste a paper of choice from the kit - I used paper6
selection invert delete
select none delete the original
Click on raster 7&8 selections,select all, float,defloat
I chose a gradient to flood fil mine
selection invert delete
select none delete the original
Click on raster 1© of 1 selections,select all, float,defloat
I used a fall gradient to fill my squares
selection invert delete
select none delete the original
apply penta dot and cross with settings of choice
Add close-up of tube you are using in squares
I applied Xero Porcelin to my tubes
Place your tube
Xero Radiance with settings of choice
Now time to add our elements
I used the following:
Element 2
Element 4
Element 5
Element 8
Element 9
Element 13
Element 17
Element 18
Element 20
Element 30
Element 35
Element 37
Element 38
Element 39
Element 40
Element 42
Element 44
Element 49
Element 55
Element 57
Element 59
Merge your layers
Open paper of choice and apply mask
Place your name where you like it
Add the Copyright and your License Number for the tube
Resize to your liking and save as PNG
This tutorial was created on November 4,2016 by Rhonda
Any resemblance to another Tag or Tutorial is purely coincidental
Saturday, October 29, 2016


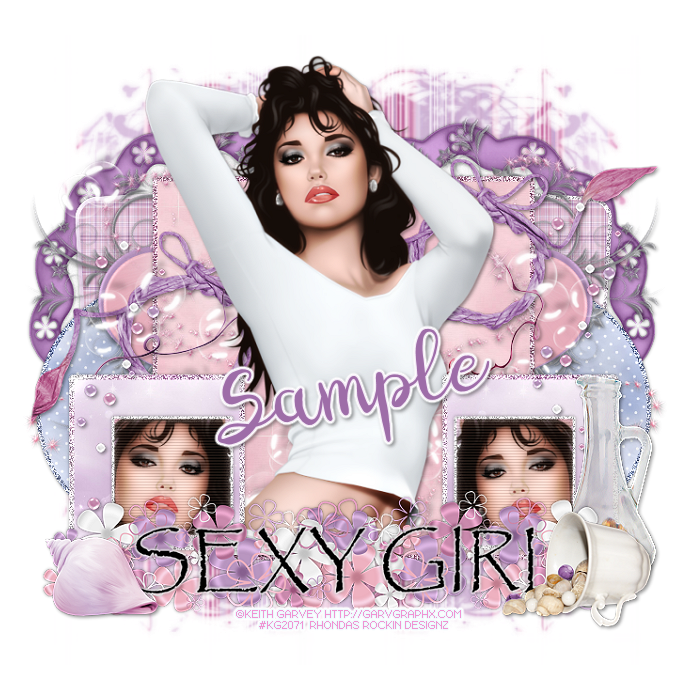
This tutorial is written for those with knowledge of PSP
Supplies Needed:
Tube of choice: I'm using the wonderful art work of Keith Garvey
You can purchase his tubes at his store HERE
FTU Scrap Kit by HorsePlay Pastures called "Pastels and Pearls" HERE
Template #828 by Millie HERE
Mask #151 by Millie HERE
Don't forget to leave a thank you when downloading
Ok Lets get Started:
Open template - Shift D to duplicate then close out original
Canvas size 700x700
Delete copyright
Click on layers 1&2 selections,select all, float,defloat
paste a paper of choice from the kit - I used paper6
selection invert delete
select none delete the original
Add borders
Click on layers 3&4 selections,select all, float,defloat
paste a paper of choice from the kit - I used paper8
selection invert delete
select none delete the original
Add borders
Click on layer 5 selections,select all, float,defloat
paste a paper of choice from the kit - I used paper14
selection invert delete
select none delete the original
Add border
Click on layers 6&7 selections,select all, float,defloat
paste a paper of choice from the kit - I used paper9
selection invert delete
select none delete the original
Add borders
Click on right orange square selections,select all, float,defloat
paste a paper of choice from the kit - I used paper6
selection invert delete
select none delete the original
Click on layers 8&9 selections,select all, float,defloat
paste a close up of tube inside square
selection invert delete
select none delete the original
Add borders
Place your tube
Now add any other elements of choice
I used the following:
Element 10
Element 18
Element 19
Element 20
Element 21
Element 22
Element 29
Element 36
Element 44
Element 45
Element 62
Merge your layers
Open paper of choice and apply mask
Place your name where you like it
Add the Copyright and your License Number for the tube
Resize to your liking and save as PNG
This tutorial was created on October 29,2016 by Rhonda
Any resemblance to another Tag or Tutorial is purely coincidental
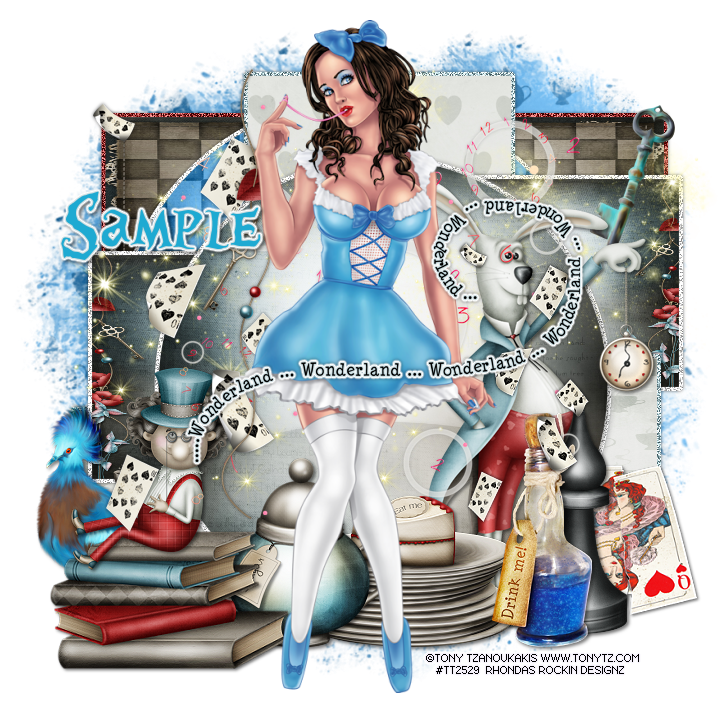
This tutorial is written for those with knowledge of PSP
Supplies Needed:
Tube of choice: Im using the wonderful art work of Tony Tzanoukakis
You can purchase his tubes at his store HERE
PTU Scrap Kit by Kizzed by Kelz "Alice in Wonderland" HERE
Also purchased at Tony T as a bundle with kit
Template #19 by Just Like Candy Designs HERE
Don't forget to leave a thank you when downloading
Move horz left to bottom
I added a border to my layers
Ok Lets get Started:
Open template - Shift D to duplicate then close out original
Canvas size 700x700
Delete copyright
Click on back circle selections,select all, float,defloat
paste a paper of choice from the kit - I used paper10
selection invert delete
select none delete the original
Click on center rectangle selections,select all, float,defloat
paste a paper of choice from the kit - I used paper1
selection invert delete
select none delete the original
Click on horz rectangle left & right selections,select all, float,defloat
paste a paper of choice from the kit - I used paper11
selection invert delete
select none delete the original
Click on lower orange rectangle selections,select all, float,defloat
paste a paper of choice from the kit - I used paper8
selection invert delete
select none delete the original
Click on right orange square selections,select all, float,defloat
paste a paper of choice from the kit - I used paper6
selection invert delete
select none delete the original
Click on center red rectangle selections,select all, float,defloat
paste a paper of choice from the kit - I used paper11
selection invert delete
select none delete the original
Click on center red circle selections,select all, float,defloat
paste a paper of choice from the kit - I used paper12
selection invert delete
select none delete the original
Place your tube
Now add any other elements of choice
I used the following:
Bird
Books
Bottle
Cake on Plates
Charm
Chess Piece 2
Clock
Falling Cards
Key
Mad Hatter
March Hare
Queen Hearts Card
Sparkle
Sugar
Timeless Clock
Word Art
Merge your layers
Open paper of choice and apply mask
Place your name where you like it
Add the Copyright and your License Number for the tube
Resize to your liking and save as PNG
This tutorial was created on October 29,2016 by Rhonda
Any resemblance to another Tag or Tutorial is purely coincidental
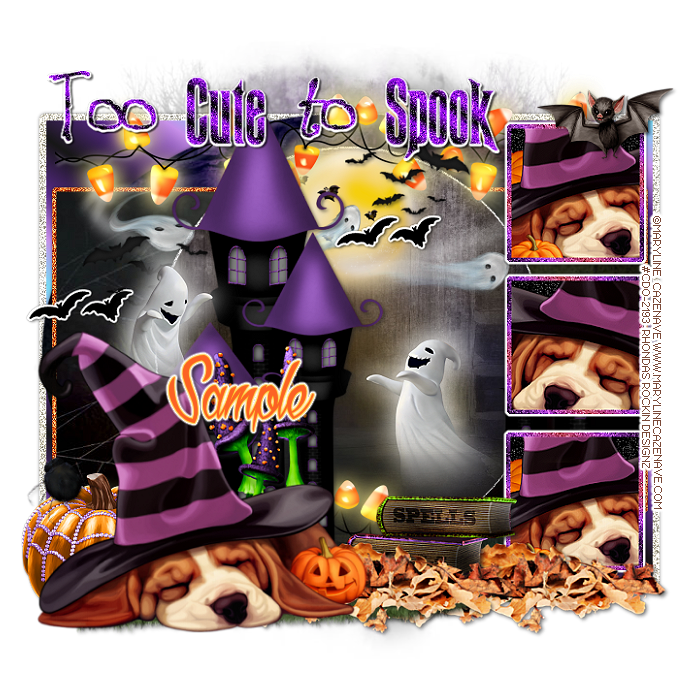
Tuesday, October 18, 2016

This tutorial is written for those with knowledge of PSP
Supplies Needed:
Tube of choice: I'm using the wonderful art work of Elias Chatzoudis
Which you must obtain a license to use HERE
PTU Scrap Kit by Jens Sweet Temptations HERE
Template #65 by Millie HERE
Ok Lets get Started:
Open template - Shift D to duplicate then close out original
Delete copyright
Click on layer 1&2 selections,select all, float,defloat
paste a paper of choice from the kit - I used paper3
selection invert delete
select none delete the original
Click on layer 3 selections,select all, float,defloat
paste a paper of choice from the kit - I used paper1
selection invert delete
select none delete the original
Click on layer 4 selections,select all, float,defloat
paste a paper of choice from the kit - I used paper4
selection invert delete
select none delete the original
Click on layer 5 selections,select all, float,defloat
paste a paper of choice from the kit - I used a solid color
selection invert delete
select none delete the original
add noise and glow
Click on layer 6 selections,select all, float,defloat
paste a paper of choice from the kit - I used paper5
selection invert delete
select none delete the original
Click on layer 7 selections,select all, float,defloat
paste a paper of choice from the kit - I used solid color
selection invert delete
select none delete the original
I used a pixel font and write Who Let The Ghosts Out
Place your tube
Now time to add our elements
I used the following:
Element 14
Element 15
Element 18
Element 30
Element 32
Element 34
Element 35
Element 36
Element 41
Element 42
Element 44
Element 45
Element 47
Element 50
Element 56
Element 57
Element 60
Merge your layers
Open paper of choice and add mask
Place your name where you like it
Add the Copyright and your License Number for the tube
Resize to your liking and save as PNG
This tutorial was created on October 16,2016 by Rhonda
Any resemblance to another Tag or Tutorial is purely coincidental
Sunday, October 16, 2016
This tutorial is written for those with knowledge of PSP
Supplies Needed:
Tube of choice: Im using the wonderful art work of VeryMany
Which you must obtain a license to use HERE
FTU Scrapkit by Bel Scrap HERE
Mask of choice
Ok Lets get Started:
Open template - Shift D to duplicate then close out original
Canvas size 700x700
delete copyright,word art and berries
Click on blk rec box selections,select all, float,defloat
paste a paper of choice from the kit - I used paper7
selection invert delete
select none delete the original
Click on L&R blue rec selections,select all, float,defloat
paste a paper of choice from the kit - I used paper1b
selection invert delete
select none delete the original
Click on upper & lower circle selections,select all, float,defloat
paste a paper of choice from the kit - I used paper8
selection invert delete
select none delete the original
Click on L&R gray bar selections,select all, float,defloat
paste a paper of choice from the kit - I used paper5
selection invert delete
select none delete the original
Click on light blue rectangle selections,select all, float,defloat
paste a paper of choice from the kit - I used paper7
selection invert delete
select none delete the original
Click on L&R pic box selections,select all, float,defloat
paste a paper of choice from the kit - I used paper2
selection invert delete
select none delete the original
I added extra noise to the frames
Click on bars selections,select all, float,defloat
paste a paper of choice from the kit - I used paper1
selection invert delete
select none delete the original
Place your tube
Xero Radiance with settings of choice
Now time to add our elements
I used the following:
Rbol
Arana 2
Brillos
Calabaza 2&4
Flor 1
Girasol
Hogas 1&2
Murcielago
Ramas
Varios
Verdura
Merge your layers
Open paper of choice and apply any mask
Place your name where you like it
Add the Copyright and your License Number for the tube
Resize to your liking and save as PNG
This tutorial was created on October 16,2016 by Rhonda
Any resemblance to another Tag or Tutorial is purely coincidental

This tutorial is written for those with knowledge of PSP
Supplies Needed:
Tube of choice: I'm using the wonderful art work of Miticheskaya
You must obtain a license to use this art HERE
PTU kit by Purple Dream Scraps called Black Wendy HERE
Mask of choice
Ok Lets get Started:
Open blank canvas 700x700
Open element 44 resize and place in center
Click inside frame with wand
Selections expand by 10
Add new layer under frame
Open paper 1 and paste into selections
Place your main tube
Now time to add our elements
I used the following:
Element 1
Element 5
Element 6
Element 8
Element 10
Element 21
Element 22
Element 35
Element 36
Element 37
Element 38
Element 48
Element 50
Element 51
Element 54
Merge your layers
Open paper of choice and apply mask
Place your name where you like it
Add the Copyright and your License Number for the tube
Resize to your liking and save as PNG
This tutorial was created on October 16,2016 by Rhonda
Any resemblance to another Tag or Tutorial is purely coincidental
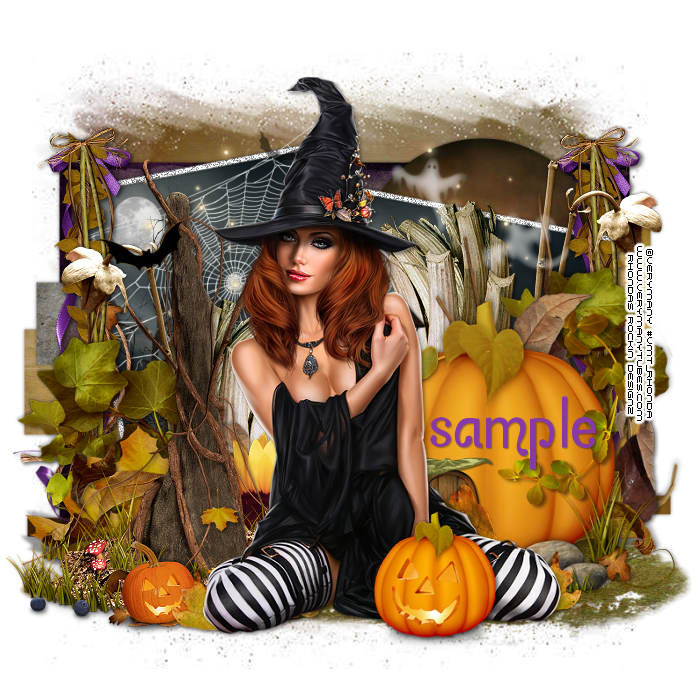
Saturday, October 15, 2016

This tutorial is written for those with knowledge of PSP
Supplies Needed:
Tube of choice: I'm using the wonderful art work of Keith Garvey
You can purchase his tubes HERE
Template by Unique Styles HERE
Please leave some love when you download
Resize elements to your liking
Ok Lets get Started:
Open template - Shift D to duplicate
Resize template to your desired size
Delete copyright
Click on raster 9 - change color to match tube you are using
Click on raster 2&5 - change color to match tube you are using
Click on raster 14&15 - change color to match tube you are using
Place close-up of tube in circle
Change blend mode to Luminious
Use any other elements you may have to tag
Place your main tube
Apply Xero Radiance
Merge your layers
Place your name where you like it
Add the Copyright and your License Number for the tube
Resize to your liking and save as PNG
This tutorial was created on October 15,2016 by Rhonda
Any resemblance to another Tag or Tutorial is purely coincidental

This tutorial is written for those with knowledge of PSP
Supplies Needed:
Tube of choice: I'm using the wonderful art work of Elias Chatzoudis
This tube was purchased at MPT which has closed
You can find his art at his new store HERE
FTU Scrapkit by Melissaz Creationz HERE
Cluster by LindaNM found at Graphic Groupies HERE
Ok Lets get Started:
Open cluster Shift D to duplicate and close original
Place tube to center of frame
Add any other elements you want from kit
Merge your layers
Open paper of choice & apply any mask
Place your name where you like it
Add the Copyright and your License Number for the tube
Resize to your liking and save as PNG
This tutorial was created on October 15,2016 by Rhonda
Any resemblance to another Tag or Tutorial is purely coincidental
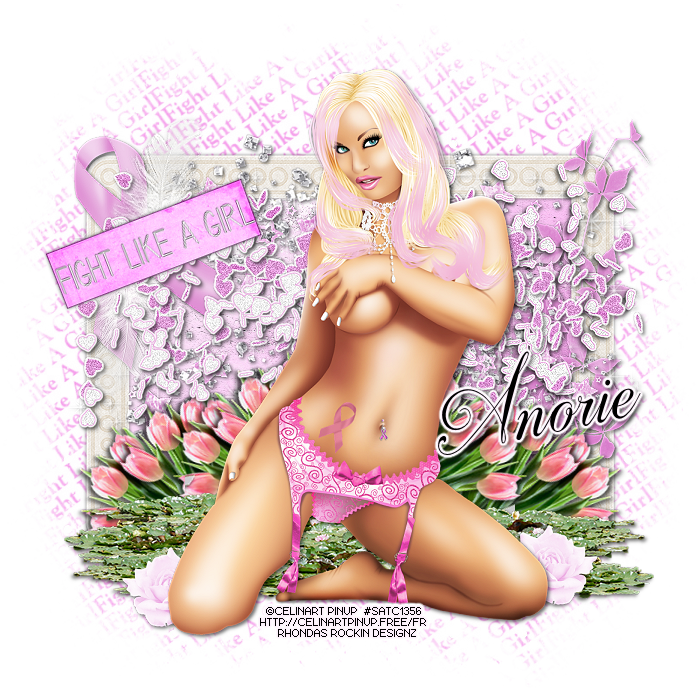
This tutorial is written for those with knowledge of PSP
Supplies Needed:
Tube of choice: I'm using the wonderful art work of Celinart Pinup
This tube was purchased at SATC which has closed
You can find her art now at different stores
FTU Scrapkit by Designs by Anorie HERE
Mask by Barbara HERE
Ok Lets get Started:
Resize elements to your liking
This is a very quick and easy tutorial
Open blank canvas 700x700
Open frame 2 and place in center
Click inside frame with magik wand
Selections modify expand by 10
Add new layer under frame and select all
Open paper 4 and paste into selections
Select none
Place your tube & build around it
Now time to add our elements
I used the following:
Element 1
Element 3
Element 14
Element 15
Element 18
Element 19
Element 20
Element 21
Element 23
Element 26
Element 28
Merge layers
Open paper of choice and apply mask
Place your name where you like it
Add the Copyright and your License Number for the tube
Resize to your liking and save as PNG
This tutorial was created on October 15,2016 by Rhonda
Any resemblance to another Tag or Tutorial is purely coincidental

This tutorial is written for those with knowledge of PSP
Supplies Needed:
Tube of choice: I'm using the wonderful art work of Tony Tzanoukakis
You must obtain a license to use from his store HERE
PTU Scrapkit by Reineke Designs which was also purchased at Tony's store HERE
Can be bought separate or as a bundle
Mask of choice
Ok Lets get Started:
Resize elements to your liking
This is a very quick and easy tutorial
Open blank canvas 700x700
Open element 20 and place in center
Click inside frame with magik wand
Selections modify expand by 10
Add new layer under frame and select all
Open paper 10 and paste into selections
Select none
Place your tube & build around it
Now time to add our elements
I used the following:
Element 4
Element 5
Element 7
Element 9
Element 12
Element 13
Element 16
Element 18
Element 22
Element 23
Element 26
Element 27
Element 28
Element 29
Merge layers
Open paper of choice and apply mask
Place your name where you like it
Add the Copyright and your License Number for the tube
Resize to your liking and save as PNG
This tutorial was created on October 12,2016 by Rhonda
Any resemblance to another Tag or Tutorial is purely coincidental

This tutorial is written for those with knowledge of PSP
Supplies Needed:
Tube of choice: I'm using the wonderful art work of VeryMany
You must obtain a license to use from their store HERE
FTU clusters from Escape From Reality HERE
Mask of choice
Word Art of choice (I forgot to ave where I got mine from)
Ok Lets get Started:
Resize elements to your liking
This is a very quick and easy tutorial
Open blank canvas 700x700
Open cluster 1 and place in center
Click inside frame with magik wand
Selections modify expand by 10
Add new layer under frame and select all
Open paper or solid color of choice and paste into selections
Select none
Use word art if desired (see my tag)
I used the other 2 clusters to decorate rest of tag
Use my tag as an example
Merge layers
Open paper of choice and apply mask
Place your name where you like it
Add the Copyright and your License Number for the tube
Resize to your liking and save as PNG
This tutorial was created on October 12,2016 by Rhonda
Any resemblance to another Tag or Tutorial is purely coincidental

This tutorial is written for those with knowledge of PSP
Supplies Needed:
Tube of choice: I'm using the wonderful art work of Tony Tzanoukakis
You must obtain a license to use from his store HERE
FTU Scrapkit from Tiny Turtle Designs HERE
Mask of choice
Ok Lets get Started:
Resize elements to your liking
This is a very quick and easy tutorial
Open blank canvas 700x700
Open element 8 and place in center
Click inside frame with magik wand
Selections modify expand by 10
Add new layer under frame and select all
Open paper 3 and paste into selections
Select none
Place your tube & build around it
Now time to add our elements
I used the following:
Elements 5
Elements 6
Elements 13
Elements 17
Elements 23
Elements 34
Elements 72
Elements 93
Elements 105
Merge layers
Open paper of choice and apply mask
Place your name where you like it
Add the Copyright and your License Number for the tube
Resize to your liking and save as PNG
This tutorial was created on October 12,2016 by Rhonda
Any resemblance to another Tag or Tutorial is purely coincidental

This tutorial is written for those with knowledge of PSP
Supplies Needed:
Tube of choice: I'm using the wonderful art work of Kajenna
You must obtain a license to use tube at PFD HERE
FTU Scrapkit by Sky's The Limit HERE
Mask by Sylly Creationz (I used bottom one) HERE
Ok Lets get Started:
This is a very quick and easy tutorial
Resize elements to your liking and don't forget to drop shadow
Open blank canvas 700x700
Open frame 2 and place in center
Duplicate frame and move under first frame
Rotate bottom frame to the right (see tag for example)
Grab the magic wand & click inside top frame
Selections modify expand by 10
Add new layer under frame
Open paper 6 & paste into selection
Select none
Place your tube & build around it
Now time to add our elements
I used the following:
Acorns
Cluster
Cornucopia
Flower 2
Folliage 3
Indian Corn
Ivy
Leaf 2&8
Leafy Vine
Mushrooms
Pumpkins
Tree
Merge your layers
Open paper of choice & apply mask
Place your name where you like it
Add the Copyright and your License Number for the tube
Resize to your liking and save as PNG
This tutorial was created on zoctober 15,2016 by Rhonda
Welcome to The Taggers Lounge Blog Train!
Be sure to stop along the ride to collect your goodies!
Also please leave some love!!
Stop by The Taggers Lounge and join in on the fun also, we would love to have you.
http://thetaggerslounge.forumotion.com
http://thetaggerslounge.blogspot.com/ Stop 1
http://tagsbytika.blogspot.com Stop 2
http://jenssweettemptations.blogspot.com Stop 3
http://anorie.blogspot.de/ Stop 4
http://mytaggingaddiction.blogspot.com/ Stop 5
http://myzticdesignzz.blogspot.com/ Stop 6
http://rhondasrockindesignz.blogspot.com/ Stop 7
http://www.pamzygreene.blogspot.com/ Stop 8

Download HERE

Download HERE

Download HERE
Subscribe to:
Posts
(Atom)
Grab My Blinkie

I CT For


Blogs I Visit


