Monday, August 31, 2015

This tutorial is written for those with knowledge of PSP
Supplies Needed:
Tube of choice: I'm using the wonderful art work of Zlata_M
Which you must obtain a license to use HERE
PTU Scrap Kit by Jen from Sweet Temptations called "Old School"
You an purchase this awesome kit HERE
Template #211 by Kristin HERE
Mask of choice
Don't forget to leave a thank you when downloading
Ok Lets get Started:
Open template - Shift D to duplicate then close out original
Resize template all layers 86%
Canvas size 700x700
Delete copyright & hearts
Click on raster 8 & copy of selections,select all, float,defloat
paste a paper of choice from the kit - I used paper2
selection invert delete
select none delete the original
Click on raster 6 & copy of selections,select all, float,defloat
paste a paper of choice from the kit - I used paper3
selection invert delete
select none delete the original
Click on raster 7 & copy of selections,select all, float,defloat
paste a paper of choice from the kit - I used paper6
selection invert delete
select none delete the original
Click on raster 3 selections,select all, float,defloat
paste a paper of choice from the kit - I used paper8
selection invert delete
select none delete the original
Click on copy of raster 3 selections,select all, float,defloat
paste a paper of choice from the kit - I used paper9
selection invert delete
select none delete the original
Click on raster 5 selections,select all, float,defloat
paste a paper of choice from the kit - I used paper1
selection invert delete
select none delete the original
Click on copy of raster 5 selections,select all, float,defloat
paste a paper of choice from the kit - I used paper7
selection invert delete
select none delete the original
Click on raster 9 & copy of selections,select all, float,defloat
add new layer and flood fill with solid color of choice
select none delete the original
add noise with settings of choice
Click on copy of raster 2 selections,select all, float,defloat
add new layer and flood fill with solid color of choice
select none delete the original
add noise with settings of choice
Click on raster 2 selections,select all, float,defloat
paste a paper of choice from the kit - I used paper4
selection invert delete
select none delete the original
Place your main tube
Xero Radiance with settings of choice
Now time to add our elements
I used the following:
Alarm Clock
Bag
Binder
Books
Calculator
Chalkboard 1
Frame 1&2
Hat
Open Book
Planner
Stapler
Merge your layers
Open paper of choice and apply mask
Place your name where you like it
Add the Copyright and your License Number for the tube
Resize to your liking and save as PNG
This tutorial was created on August 31,2015 by Rhonda
Any resemblance to another Tag or Tutorial is purely coincidental
Sunday, August 30, 2015

This tutorial is written for those with knowledge of PSP
Supplies Needed:
Tube of choice: I'm using the wonderful art work of Vi Nina
You must obtain a license to use this art at S&Co HERE
PTU Scrapkit from Disturbed Scraps called "School Days"
You can purchase this awesome kit at S&Co HERE
Kit matches tube!!!!!
Mask of choice
Ok Lets get Started:
Open blank canvas 700x700
Open element 71 resize and place to center of canvas
Click insie with magic wand
Selections modify and expand by 10
Add new layer under frame and select all
Open paper 5 and paste into selections
Select none
Place your tube
Now time to add our elements
I used the following:
Element 4
Element 6
Element 8
Element 10
Element 12
Element 15
Element 17
Element 19
Element 21
Element 30
Element 41
Element 42
Element 46
Element 49
Element 81
Merge layers
Open paper of choice and apply a mask
Place your name where you like it
Add the Copyright and your License Number for the tube
Resize to your liking and save as PNG
This tutorial was created on August 29,2015 by Rhonda
Any resemblance to another Tag or Tutorial is purely coincidental

This tutorial is written for those with knowledge of PSP
Supplies Needed:
Tube of choice: I'm using the wonderful art work of Ismael rac
You can purchase his work HERE
PTU Scrapkit by Wicked Creationz purchased at Xeracx HERE
Template by Sparkle Design HERE
Mask #2 by Sparkle Design HERE
Don't forget to leave a thank you when downloading
Ok Lets get Started:
Open template - Shift D to duplicate then close out original
Canvas Size 700x700
Delete copyright
Click on raster 1 selections,select all, float,defloat
paste a paper of choice from the kit - I used paper5
selection invert delete
select none delete the original
add border with noise
Click on raster 2 selections,select all, float,defloat
paste a paper of choice from the kit - I used paper4
selection invert delete
select none delete the original
add border with noise
Click on raster 3 selections,select all, float,defloat
paste a paper of choice from the kit - I used paper2
selection invert delete
select none delete the original
add border with noise
Click on raster 4 selections,select all, float,defloat
paste a paper of choice from the kit - I used paper8
selection invert delete
select none delete the original
add border with noise
Click on raster 5 selections,select all, float,defloat
paste a paper of choice from the kit - I used paper3
selection invert delete
select none delete the original
add border with noise
Click on raster 6 selections,select all, float,defloat
paste a paper of choice from the kit - I used paper7
selection invert delete
apply Filters Unliminted
select none delete the original
add border with noise
Click on raster 7 selections,select all, float,defloat
add new layer and flood fill with gradient of choice
add close-up of tube
apply Xero Radiance
selection invert delete
select none delete the original
Click on raster 8 selections,select all, float,defloat
add new layer and flood fill with solid color of choice
select none delete the original
add noise
Place your main tube
Xero Radiance with settings of choice
Now time to add our elements
I used the following:
Element 3
Element 5
Element 11
Element 14
Element 16
Element 21
Element 24
Element 25
Element 30
Merge your layers
Open paper of choice & apply mask
Place your name where you like it
Add the Copyright and your License Number for the tube
Resize to your liking and save as PNG
This tutorial was created on August 29,2015 by Rhonda
Any resemblance to another Tag or Tutorial is purely coincidental


This tutorial is written for those with knowledge of PSP
Supplies Needed:
Tube of choice: I'm using the wonderful art work of Zindy Zone
You can purchase these tubes at her store HERE
FTU Scrapkit by Scrappy Bit Of Fun HERE
Don't forget to leave a thank you when downloading
Don't forget to sharpen after resizing and add drop shadow of choice
Ok Lets get started:
Open blank canvas size 700x700
Open frame_004 - resize and place in center
Open frame_006 - resize and connect to other frame
Click inside each frame
Selections modify expand by 10
Add new layer under frames
Open paper 001 and paste into selections
Select none
Open element_023 - resize then rotate 90% to right
Place element on top of frames slightly inward to the left side
Duplicate element and mirror
Open element_005 - resize place to far right of frame
Open element_006 - resize place to far right behind other rose
Merge these 2 as one layer
Duplicate and mirror
Open element_019 - place to far right of frame
(You want the 2 roses sitting beside the button)
Open element_029 - resize & place to far left of frame
This element goes behind the roses
Duplicate element_029 - resize a little
Open your tube and place anywhere on the frames
Merge layers
Open scatter_004 and use as a mask
Place your name where you like it
Add the Copyright and your License Number for the tube
Resize to your liking and save as PNG
This tutorial was created on August 15,2015 by Rhonda
Any resemblance to another Tag or Tutorial is purely coincidental

This tutorial is written for those with knowledge of PSP
Supplies Needed:
Tube of choice: I'm using the wonderful art work of Kate Miller
You must obtain a license to use this art at S&CO HERE
Matching PTU Scrapkit by Bibi's Collection also at S&CO HERE
Mask of choice
Ok Lets get Started:
This is a very quick and easy tutorial
Open blank canvas 700x700
Open element 54 & place in center
Grab the magic wand & click inside frame
Selections modify expand by 20
Add new layer under frame
Open paper 1 & paste into selections
Select none
Add close up of tube inside frame
Change blend mode to soft light
Place main tube to right of tag
Add any other elements you want from the kit
I used:
Element 16
Element 33
Element 34
Element 49
Element 55
Element 62
Element 65
Element 66
Element 75
Element 82
Element 98
Element 100
Merge layers
Open paper 12 & apply mask of choice
Place your name where you like it
Add the Copyright and your License Number for the tube
Resize to your liking and save as PNG
This tutorial was created on August 29,2015 by Rhonda
Any resemblance to another Tag or Tutorial is purely coincidental
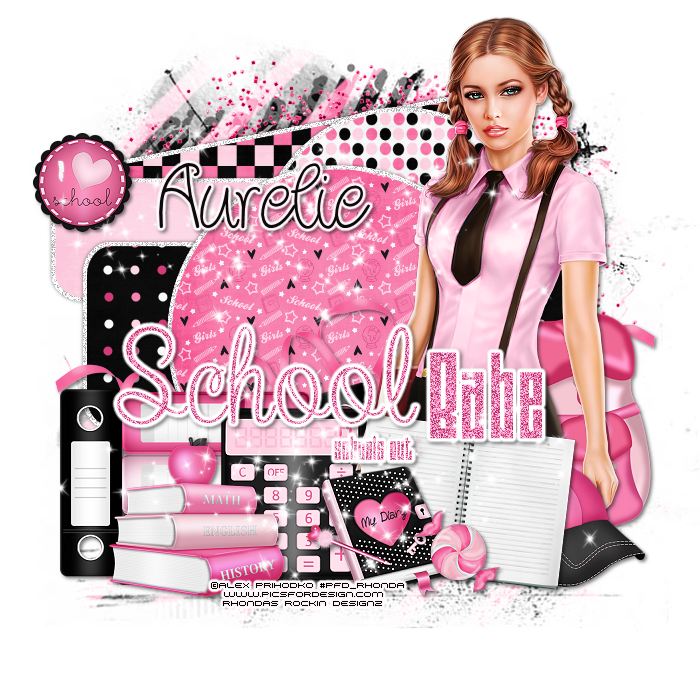
This tutorial is written for those with knowledge of PSP
Supplies Needed:
Tube of choice: I'm using the wonderful art work of Alex Prihodko
Which you must obtain a license to use at PFD HERE
PTU Scrap Kit by Aurelie from Purple Dreams Scraps HERE
Template by Sparkle Design HERE
Mask of choice
Ok Lets get Started:
Open template - Shift D to duplicate then close out original
Increase canvas to 700x700
Delete copyright
Click on raster 1 selections,select all, float,defloat
paste a paper of choice from the kit - I used paper9
selection invert delete
select none delete the original
Add border if desired
Click on raster 3 selections,select all, float,defloat
paste a paper of choice from the kit - I used paper8
selection invert delete
select none delete the original
add border if desired
Click on raster 2 selections,select all, float,defloat
paste a paper of choice from the kit - I used paper3
selection invert delete
select none delete the original
add border if desired
Click on raster 4 selections,select all, float,defloat
paste a paper of choice from the kit - I used paper5
selection invert delete
select none delete the original
add border if desired
Click on raster 5 selections,select all, float,defloat
paste a paper of choice from the kit - I used paper10
selection invert delete
select none delete the original
add border if desired
Click on raster 6 selections,select all, float,defloat
paste a paper of choice from the kit - I used paper6
selection invert delete
select none delete the original
add noise and eyecandy gradient
Place your main tube
Xero Radiance with settings of choice
Now time to add our elements
I used the following:
Element 2
Element 3
Element 5
Element 19
Element 20
Element 21
Element 32
Element 36
Element 38
Element 49
Element 50
Merge your layers
Open paper 14 and apply mask
Place your name where you like it
Add the Copyright and your License Number for the tube
Resize to your liking and save as PNG
This tutorial was created on August 29,2015 by Rhonda
Any resemblance to another Tag or Tutorial is purely coincidental
Saturday, August 29, 2015

TY Maria!!!!! Awesome job as always
You can find Maria's blog HERE
She has some awesome clusters, mask and all sorts of goodies
Make sure to check her out

Thursday, August 27, 2015
I am sorry for not posting any new tutorials
I hurt my back in June at a water park with the grandkids
I have been having a lot of issues since then.
I have 2 bulging disc's, a herniated disc and a compression fracture to my lower back
I am being seen by a neurologist and right now receiving a series of spinal injections
I am unable to sit at computer for long periods due to pain.
I am still trying to do some tags/tutorials but it takes me a long time
I am taking a break from some of my CT obligations until things get better
I will try to post new tutorials as I get them done
TY for all your support and I hope to get back to psp'ing as soon as I am able
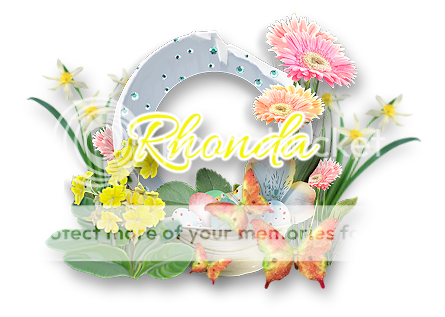
Saturday, August 15, 2015
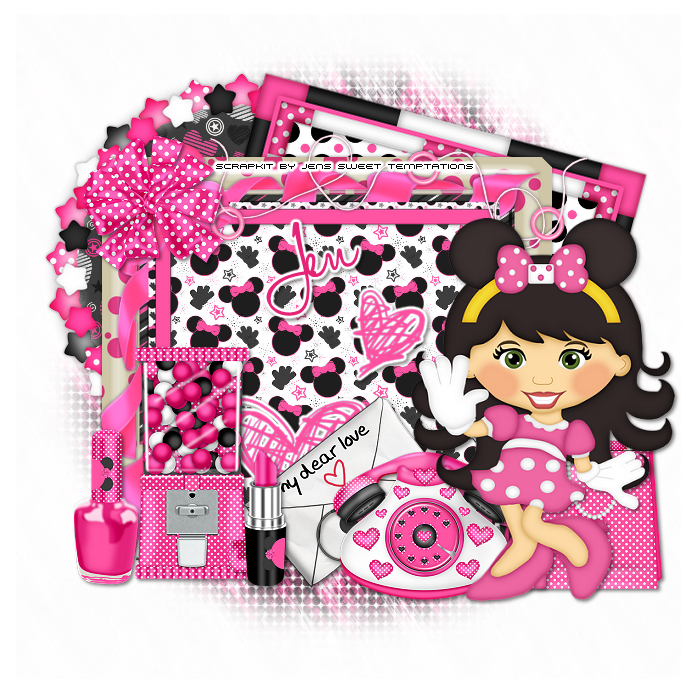
This tutorial is written for those with knowledge of PSP
Supplies Needed:
Tube of choice: I'm using one in the kit
PTU Scrap Kit by Jen from Sweet Temptations called "That Magic Moment"
You an purchase this awesome kit at one of her stores HERE
Mask of choice
Ok Lets get Started:
Open blank canvas 700x700
Open frame 6 and place in center
Click inside with magic wand & expand by 10
Open paper 4 and paste as new layer
Selections invert delete
Merge the 2 as one
Open frame 5 and place in center
Click inside with magic wand & expand by 10
Open paper 8 and paste as new layer
Selections invert delete
Merge the 2 as one
Place this frame behind the first one
Open frame 2 and place to right of canvas
Click inside with magic wand & expand by 10
Open paper 3 and paste as new layer
Selections invert delete
Merge the 2 as one
Open frame 1 and place to left
Click inside with magic wand & expand by 10
Open paper 2 and paste as new layer
Selections invert delete
Merge the 2 as one
See my tag for placement of frames
Add one of the tubes included in kit or one you have
Now time to add our elements
I used the following:
Bow 1
Envelope
Gumball Machine
Hearts
Lipstick
Nail Polish
Shopping Bag
String
Telephone
Merge your layers
Open paper 10 and apply mask
Place your name where you like it
Add the Copyright and your License Number for the tube
Resize to your liking and save as PNG
This tutorial was created on August 15,2015 by Rhonda
Any resemblance to another Tag or Tutorial is purely coincidental

This tutorial is written for those with knowledge of PSP
Supplies Needed:
Tube of choice: I'm using one in the kit
PTU Scrap Kit by Jen from Sweet Temptations called "That Magic Moment"
You an purchase this awesome kit at one of her stores HERE
Template #1 by Denz Designz HERE
Mask of choice
Ok Lets get Started:
Open template - Shift D to duplicate then close out original
Resize all layers 112%
Canvas size 700x650
Delete copyright,text,word art & arrow
Click on black circle selections,select all, float,defloat
paste a paper of choice from the kit - I used paper1
selection invert delete
select none delete the original
Click on back 1 selections,select all, float,defloat
paste a paper of choice from the kit - I used paper8
selection invert delete
select none delete the original
Add noise to frame 1&2
Click on back 2 selections,select all, float,defloat
paste a paper of choice from the kit - I used paper3
selection invert delete
select none delete the original
Click on strip selections,select all, float,defloat
paste a paper of choice from the kit - I used paper10
selection invert delete
select none delete the original
Click on star 1 selections,select all, float,defloat
paste a paper of choice from the kit - I used paper5
selection invert delete
select none delete the original
Click on star 2 selections,select all, float,defloat
paste a paper of choice from the kit - I used paper6
selection invert delete
select none delete the original
Add one of the tubes included in kit or one you have
Now time to add our elements
I used the following:
Car
Castle
Fireworks 2
Fun
Gumball Machine
Hot Air Balloon
Journal
Music
Suitcases
Sunglasses
This Magical Moment
Ticket
Merge your layers
Open paper 4 and apply mask
Place your name where you like it
Add the Copyright and your License Number for the tube
Resize to your liking and save as PNG
This tutorial was created on August 15,2015 by Rhonda
Any resemblance to another Tag or Tutorial is purely coincidental

This tutorial is written for those with knowledge of PSP
Supplies Needed:
Tube of choice: I'm using the wonderful art work of Keith Garvey
You must obtain a license to use his art HERE
FTU Scrapkit by Melissaz Creationz HERE
Template #2 by Fired By Flamin HERE
Mask of choice
Don't forget to leave a thank you when downloading
Ok Lets get Started:
Open template - Shift D to duplicate then close out original
Deleted copyright, wordart, small red circles and dotted circles
Click on red circle selections,select all, float,defloat
paste a paper of choice from the kit - I used paper1
selection invert delete
select none delete the original
Click on yellow circle selections,select all, float,defloat
paste a paper of choice from the kit - I used paper8
selection invert delete
select none delete the original
Click on yellow rectangle selections,select all, float,defloat
paste a paper of choice from the kit - I used paper5
selection invert delete
select none delete the original
Click on right grey rectangle selections,select all, float,defloat
add color of choice on new layer
select none delete the original
apply Filters Unliminted Fine Canvas
Repeat for left grey rectangle but use a different color
Paste close-up of tube inside rectangles
apply Xero Porcelin with settings of choice
Click on right green border selections,select all, float,defloat
add color of choice on new layer
select none delete the original
apply noise with settings of choice
Place your main tube in center
Xero Radiance with settings of choice
Now time to add our elements
I used the following:
Element 3
Element 10
Element 17
Element 25
Element 26
Element 28
Element 29
Element 30
Element 34
Element 35
Element 36
Merge your layers
Open paper 6 & apply mask of choice
Place your name where you like it
Add the Copyright and your License Number for the tube
Resize to your liking and save as PNG
This tutorial was created on August 15,2015 by Rhonda
Any resemblance to another Tag or Tutorial is purely coincidental
Monday, August 10, 2015
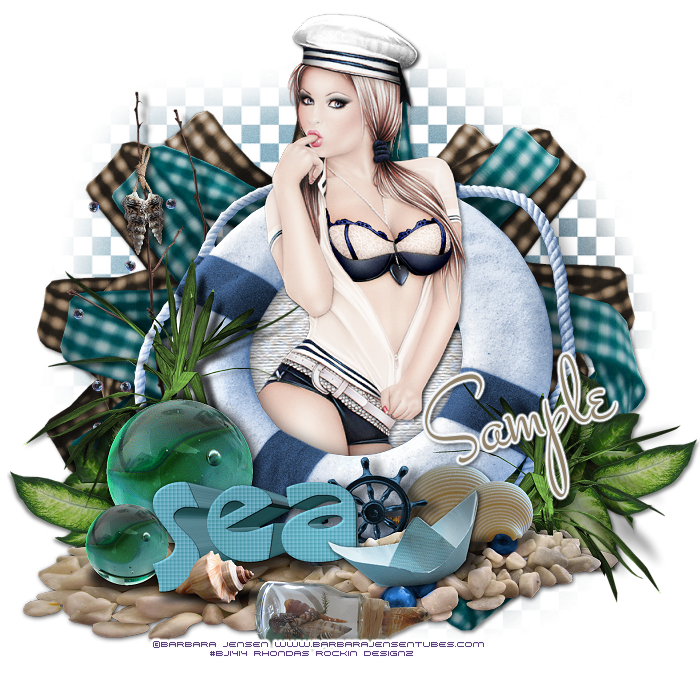
This tutorial is written for those with knowledge of PSP
Supplies Needed:
Tube of choice: I'm using the wonderful art work of Barbara Jensen
You can purchase these tubes at her store HERE
FTU Scrapkit by Moje HERE
Mask of choice
You only have to download the clusters, element2 and papers
Ok Lets get started:
Open blank canvas size 700x700
Open cluster 5, resize 30% and paste as new layer
Grab the magic wand & click inside frame
Selections modify expand by 6
Open paper 12 & paste as new layer - select none
Selections invert delete
Move paper under frame
Open element 108 - resize 20% & place to right side behind frame
Dupliacate and mirror
Open element 80 - resize 18% & place somewhere in front
Open element 103 - resize 51% & place behind frame showing at top
Open element 63 - resize 48% & place behind other ribbon
Merge your layers
Open paper of choice and apply mask
Place your name where you like it
Add the Copyright and your License Number for the tube
Resize to your liking and save as PNG
This tutorial was created on July 31,2015 by Rhonda
Any resemblance to another Tag or Tutorial is purely coincidental

This tutorial is written for those with knowledge of PSP
Supplies Needed:
Tube of choice: I'm using the wonderful art work of Ismael Rac
You can purchase his work at his store HERE
PTU Scrapkit by Sandys Design called School Hottie HERE
Tube and kit can be purchased together
Template #673 by Millie HERE
Mask#2 by Rocked by Rachel HERE
Don't forget to leave a thank you when downloading
Ok Lets get Started:
Open template - Shift D to duplicate then close out original
Canvas size 700x700
Deleted copyright
Click on raster 1 selections,select all, float,defloat
paste a paper of choice from the kit - I used paper7
selection invert delete
select none delete the original
Click on raster 2&5 selections,select all, float,defloat
paste a paper of choice from the kit - I used paper13
selection invert delete
select none delete the original
Click on raster 3&4 selections,select all, float,defloat
paste a paper of choice from the kit - I used paper6
selection invert delete
select none delete the original
Click on raster 6 selections,select all, float,defloat
paste a paper of choice from the kit - I used paper11
selection invert delete
select none delete the original
Click on raster 7 selections,select all, float,defloat
paste a paper of choice from the kit - I used paper3
selection invert delete
select none delete the original
Click on raster 8 selections,select all, float,defloat
paste a paper of choice from the kit - I used paper9
selection invert delete
select none delete the original
Click on raster 9 selections,select all, float,defloat
paste a paper of choice from the kit - I used paper1
selection invert delete
select none delete the original
Place your main tube
Now time to add our elements
I used the following:
World Globe
Book
Calculator
Flower 1
Glue 2
Paint Pallet 1
Paper Clips
School Bag
Sparkles 1&2
Merge your layers
Open paper 10 and apply mask
Place your name where you like it
Add the Copyright and your License Number for the tube
Resize to your liking and save as PNG
This tutorial was created on August 7,2015 by Rhonda
Any resemblance to another Tag or Tutorial is purely coincidental

This tutorial is written for those with knowledge of PSP
Supplies Needed:
Tube of choice: I'm using the wonderful art work of Chris Pastel
You must obtain a license to use this art at S&Co HERE
Matching PTU Scrapkit from Disturbed Scrap HERE
Template by Sparkle Designz HERE
Ok Lets get Started:
Open template - Shift D to duplicate then close out original
Resize template by 90% all layers
Increase canvas size to 700x700
Delete copyright
Click on raster 1 selections,select all, float,defloat
paste a paper of choice from the kit - I used paper5
selection invert delete
select none delete the original
Click on vector 1 selections,select all, float,defloat
paste a paper of choice from the kit - I used paper7
selection invert delete
select none delete the original
Click on raster 2&3 selections,select all, float,defloat
paste a paper of choice from the kit - I used paper1
selection invert delete
select none delete the original
Click on raster 4 selections,select all, float,defloat
paste a paper of choice from the kit - I used paper11
selection invert delete
select none delete the original
Click on raster 5 selections,select all, float,defloat
paste a paper of choice from the kit - I used paper10
selection invert delete
select none delete the original
Click on raster 6&7 selections,select all, float,defloat
paste a paper of choice from the kit - I used paper8
selection invert delete
select none delete the original
Add closeup of tube inside circles
Click on raster 8&9 selections,select all, float,defloat
paste a paper of choice from the kit - I used paper2
selection invert delete
select none delete the original
Place your main tube
Now time to add our elements
I used the following:
Element 2
Element 4
Element 6
Element 7
Element 8
Element 14
Element 23
Element 28
Element 40
Element 41
Element 42
Element 43
Element 48
Element 49
Element 70
Element 71
Element 79
Element 81
Merge your layers
Open paper 11 & apply mask
Place your name where you like it
Add the Copyright and your License Number for the tube
Resize to your liking and save as PNG
This tutorial was created on August 10,2015 by Rhonda
Any resemblance to another Tag or Tutorial is purely coincidental
Wednesday, August 5, 2015

This tutorial is written for those with knowledge of PSP
Supplies Needed:
Tube of choice: I'm using the wonderful art work of VeryMany
You must obtain a license to use this art HERE
PTU Scrapkit by BLT Dezignz called Written Stars
You can purchase the kit HERE
Template #102 by Bookworm Dezines HERE
Links are on the left side of blog
Mask #7 from HorsePlays Pasture HERE
Resize elements to your liking
Ok Lets get Started:
Open template - Shift D to duplicate then close out original
Delete copyright
Click on black top & bottom squares selections,select all, float,defloat
paste a paper of choice from the kit - I used paper3
selection invert delete
select none delete the original
Click on circle selections,select all, float,defloat
paste a paper of choice from the kit - I used paper10
selection invert delete
select none delete the original
Click on rectangle selections,select all, float,defloat
paste a paper of choice from the kit - I used paper12
selection invert delete
select none delete the original
Click on bottom and top square selections,select all, float,defloat
paste a paper of choice from the kit - I used paper4
selection invert delete
select none delete the original
Place your main tube
Now time to add our elements
I used the following:
Bag
Box
Butterfly
Card
Column
Flower 2,3,5,6,7&8
Gift
Scatter
Merge your layers
Open paper 8 and apply mask
Place your name where you like it
Add the Copyright and your License Number for the tube
Resize to your liking and save as PNG
This tutorial was created on August 5,2015 by Rhonda
Any resemblance to another Tag or Tutorial is purely coincidental
Tuesday, August 4, 2015

This tutorial is written for those with knowledge of PSP
Supplies Needed:
Tube of choice: I'm using the wonderful art work of Celinart Pinup
I purchased this tube from S&Co
You can find her tubes HERE
PTU Scrap Kit by Laura from Tiny Turtle Design called "Antique Steam"
You an purchase this awesome kit at her store HERE
Steampunk Mask #122 by Babs Bitzy Designz HERE
Resize elements to your liking
Ok Lets get Started:
Open canvas size 700x700
Open element 14 and paste as new layer
Click inside frame with magic wand and expand by 15
Open paper 3 & paste as new layer
Selections invert delete
Move paper under frame
Place your main tube to center of frame
Add Xero Radiance with settings of choice
Now lets add other elements to our tag
I used:
Element 3
Element 17
Element 27
Element 29
Element 32
Element 33
Element 82
Element 84
Element 86
Element 122
Element 140
Element 145
Element 152
Element 159
Merge layers
Open paper of choice and apply mask
Place your name where you like it
Add the Copyright and your License Number for the tube
Resize to your liking and save as PNG
This tutorial was created on August 4,2015 by Rhonda
Any resemblance to another Tag or Tutorial is purely coincidental
Monday, August 3, 2015
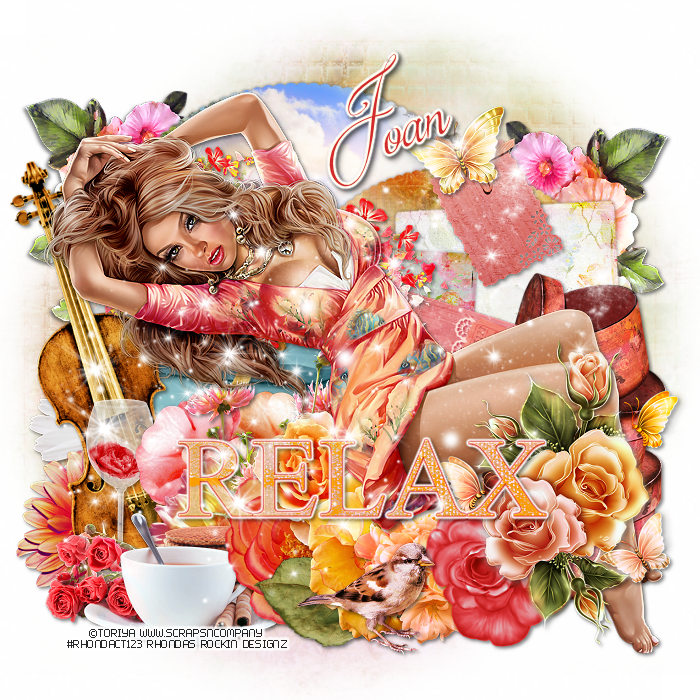
This tutorial is written for those with knowledge of PSP
Supplies Needed:
Tube of choice: I'm using the wonderful art work of Toriya
You must obtain a license to use this art at S&Co HERE
Matching PTU Scrapkit by Designs by Joan also at S&Co HERE
Template #195 by HorsePlay's Pasture Design HERE
Mask of choice
Ok Lets get Started:
Open template - Shift D to duplicate then close out original
Canvas size 700x700
delete copyright & layers 7,8,9
Click on layer 1 selections,select all, float,defloat
paste a paper of choice from the kit - I used paper2
selection invert delete
select none delete the original
Click on layer 2 selections,select all, float,defloat
paste a paper of choice from the kit - I used paper8
selection invert delete
select none delete the original
Click on layers 3 selections,select all, float,defloat
paste a paper of choice from the kit - I used paper3
selection invert delete
select none delete the original
Click on layers 4 selections,select all, float,defloat
paste a paper of choice from the kit - I used paper4
selection invert delete
select none delete the original
Click on layers 5 selections,select all, float,defloat
paste a paper of choice from the kit - I used paper6
selection invert delete
select none delete the original
Click on layer 6 selections,select all, float,defloat
paste a paper of choice from the kit - I used paper1
selection invert delete
select none delete the original
Click on layer 10 selections,select all, float,defloat
paste a paper of choice from the kit - I used paper7
selection invert delete
select none delete the original
Place your main tube
Now time to add our elements
I used the following:
Element 4
Element 10
Element 14
Element 15
Element 16
Element 21
Element 24
Element 27
Element 30
Element 33
Element 42
Element 47
Element 51
Element 60
Element 71
Element 73
Element 77
Element 80
Element 82
Element 89
Element 94
Merge your layers
Open paper of choice & apply mask
Place your name where you like it
Add the Copyright and your License Number for the tube
Resize to your liking and save as PNG
This tutorial was created on August 3,2015 by Rhonda
Sunday, August 2, 2015

This tutorial is written for those with knowledge of PSP
Supplies Needed:
Tube of choice: I'm using the wonderful art work of Keith Garvey
Which you must obtain a license to use HERE
FTU Scrap Kit by Annaica's Place HERE
Template #194 by Gimptastic HERE
Mask of choice
Don't forget to leave a thank you when downloading
Ok Lets get Started:
Open template - Shift D to duplicate then close out original
Resize template 120% all layers
Canvas size 700x700
delete copyright,wordart & hearts
Click on layers 12 & 13 selections,select all, float,defloat
paste a paper of choice from the kit - I used paper5
selection invert delete
select none delete the original
Add border with noise
Click on layers 9&11 selections,select all, float,defloat
paste a paper of choice from the kit - I used paper12
selection invert delete
select none delete the original
Add noise to layers 8&10
Click on layers 6&7 selections,select all, float,defloat
paste a paper of choice from the kit - I used paper9
selection invert delete
select none delete the original
Click on layer 5 selections,select all, float,defloat
paste a paper of choice from the kit - I used paper8
selection invert delete
select none delete the original
Add noise to layer 4
Place your main tube
Now time to add our elements:
Elements 1
Elements 3
Elements 4
Elements 5
Elements 6
Elements 9
Elements 10
Elements 11
Elements 13
Elements 15
Elements 16
Elements 20
Elements 24
Elements 27
Elements 28
Elements 29
Elements 33
Frame 3
Word Art
Merge your layers
Open paper 10 & apply mask
Place your name where you like it
Add the Copyright and your License Number for the tube
Resize to your liking and save as PNG
This tutorial was created on August 2,2015 by Rhonda
Any resemblance to another Tag or Tutorial is purely coincidental
Subscribe to:
Posts
(Atom)
Grab My Blinkie

I CT For


Blogs I Visit


