Thursday, July 31, 2014


Monday, July 28, 2014


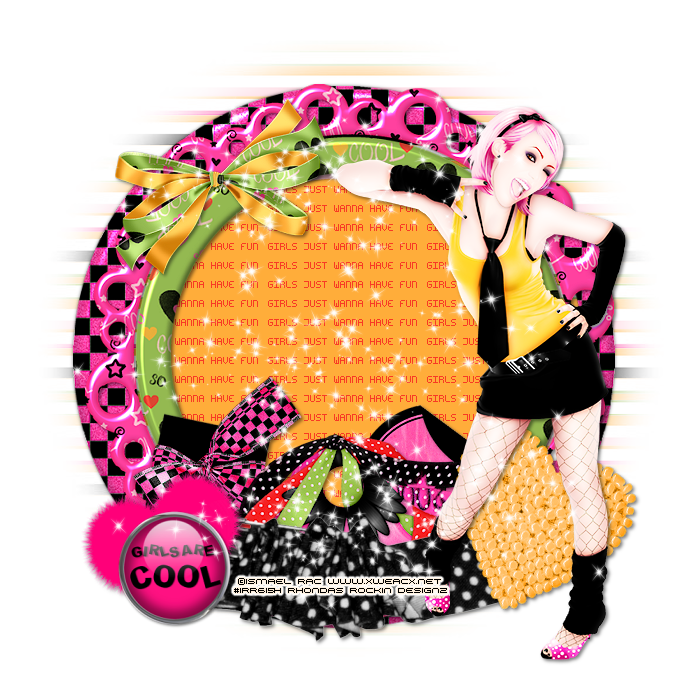


This tutorial is written for those with knowledge of PSP
Supplies Needed:
Tube of choice: I'm using the wonderful art work of Keith Garvey
You can purchase his tubes at Garv - Girls PSP HERE
Template #99 by Yvette HERE
Mask of choice
Don't forget to leave a thank you when downloading
Xero Radiance
Open template - Shift D to duplicate then close out original
Canvas size 700x700
Delete copyright & next 4 layers
Dropshadow as you wish
new layer & paste paper 7 into selection
select none delete the original
add new layer & flood fill with red color
select none delete the original
new layer & paste paper 2 into selection
select none delete the original
Open W1 & place to far right of template
Open W33 - resize 86% and place next to tree up close to middle
Open W6 - resize 50% and place at bottom of tree
Open W5 - resize 50% and place in front of other flower
Open W37 - resize 58% and place next to flower toward left
Open W41 - resize 80% and place to far left of template
Open W24 - resize 75% and place beside the cups
Open W51 and place in front of cups & cupcake
Open W12 - resize 28% and place in front of hat
Open tube - resize as needed and place to right of tag
Apply Xero Radiance with settings of choice
Open W28 - resize 68% and place at bottom of tag to right
Open W3 & W13 - resize 25% and place at top of tag to your liking
Open paper 1 & apply mask of choice
Add the Copyright and your License Number for the tube
Resize to your liking and save as PNG
This tutorial was created on July 10,2014 by Rhonda
Any resemblance to another Tag or Tutorial is purely coincidental

This tutorial is written for those with knowledge of PSP
Supplies Needed:
Tube of choice: I'm using the wonderful art work of Andy Cooper
You must obtain a license to use his art at S&Co HERE
Matching PTU Scrapkit by DNScraps HERE
Mask of choice
This is a very quick and easy tutorial
Open blank canvas 700x700
Open framewood and place to top left
Rotate slightly to the left
Grab the magic wand & click inside frame
Selections modify expand by 10
Add new layer under frame
Open paper 5 & paste into selections
Open goldenframe and place to right bottom
Rotate slightly to the right
Grab the magic wand & click inside frame
Selections modify expand by 10
Add new layer under frame
Open paper 9 & paste into selections
I used:
Bird
Castle
Cat
Cloud
Book
Dragonfly
Genius
Glass
Walk
Lamp
Leaves
Stars
Teapot
Open paper 10 & apply mask of choice
Add the Copyright and your License Number for the tube
Resize to your liking and save as PNG
This tutorial was created on July 28,2014 by Rhonda
Any resemblance to another Tag or Tutorial is purely coincidental
Saturday, July 19, 2014

This tutorial is written for those with knowledge of PSP
Supplies Needed:
Tube of choice: I'm using the wonderful art work of Danny Lee
You must obtain a license to use his art at S&Co HERE
Matching PTU Scrapkit by Disturbed Scraps HERE
Mask #55 by Rosesblack HERE
This is a very quick and easy tutroial
Open element 106 & place in center toward left
Grab the magic wand & click inside frame
Selections modify expand by 10
Add new layer under frame
Open paper 11 & paste into selections
I used:
Element 8
Element 17
Element 30
Element 36
Element 41
Element 52
Element 55
Element 65
Element 66
Element 69
Element 72
Element 85
Element 90
Open paper 6 & apply mask of choice
Add the Copyright and your License Number for the tube
Resize to your liking and save as PNG
This tutorial was created on July 19,2014 by Rhonda
Any resemblance to another Tag or Tutorial is purely coincidental
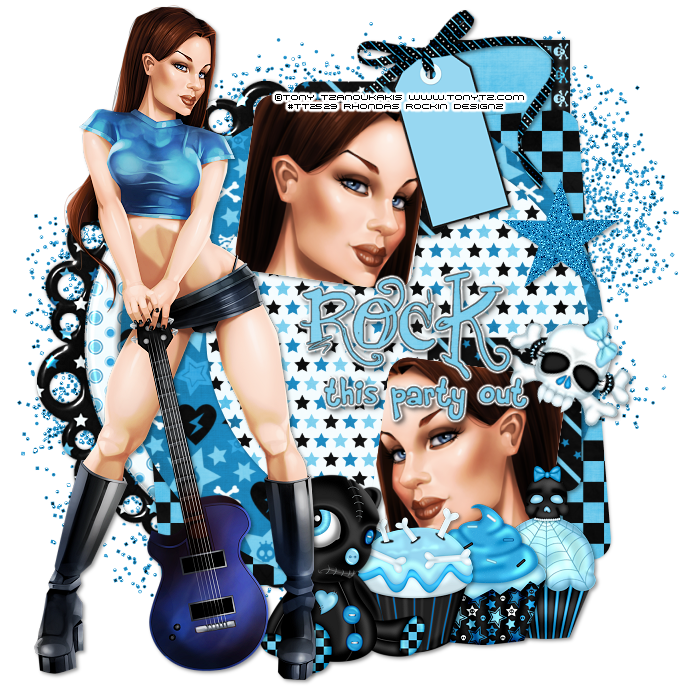
Friday, July 18, 2014

Shelly tried my Sailor Girl tutorial & sent me the results
Thursday, July 17, 2014

This tutorial is written for those with knowledge of PSP
Supplies Needed:
Tube of choice: I'm using the wonderful art work of Spazzd Art
Which you must obtain a license to use HERE
PTU Scrap Kit by Purple Dream Scraps called Let's Rock
You an purchase this awesome kit HERE
Template #344 by Divine Intentionz HERE
Mask of choice
Don't forget to leave a thank you when downloading
Xero Radiance
Open template - Shift D to duplicate then close out original
Resize template 90% all layers
Canvas 700x700
deleted copyright,wordart,thin rectangle,dotted line & hearts
paste a paper of choice from the kit - I used paper6
selection invert delete
select none delete the original
paste a paper of choice from the kit - I used paper11
selection invert delete
select none delete the original
add new layer & paste color of choice
add noise with settings of choice
select none delete the original
paste a paper of choice from the kit - I used paper9
selection invert delete
select none delete the original
paste a paper of choice from the kit - I used paper1
selection invert delete
select none delete the original
paste a paper of choice from the kit - I used paper4
selection invert delete
select none delete the original
add new layer & paste color of choice
select none delete the original
Add noise with settings of choice
paste close-up of tube inside circle
selection invert delete
select none delete the original
apply Xero Radiance with default settings
Xero Radiance with settings of choice
I used the following:
Beads
CD
Cupcake
Guitar
Headphones
Ipod
Ipod 2
Keyboard
Sparkles
Speakers
Open paper of choice & apply mask
Add the Copyright and your License Number for the tube
Resize to your liking and save as PNG
This tutorial was created on July 17,2014 by Rhonda
Any resemblance to another Tag or Tutorial is purely coincidental
Monday, July 14, 2014

This tutorial is written for those with knowledge of PSP
Supplies Needed:
Tube of choice: I'm using the wonderful art work of The Hunter
You must obtain a license to use his art at S&Co HERE
Matching PTU Scrapkit by Designs by Joan HERE
Mask of choice
Xero Radiance
It is a must have kit!!!!!!!!!!!!!!
This is a very quick and easy tutroial
Open element 39 & place in center of tag
Grab the magic wand & click inside frame
Selections modify expand by 10
Add new paper under frame
Open paper 5 & paste into selections
apply Xero Radiance with settings of choice
I used:
Element 6
Element 9
Element 27
Element 28
Element 44
Element 52
Element 56
Element 73
Element 87
Open paper 2 & apply mask of choice
Add the Copyright and your License Number for the tube
Resize to your liking and save as PNG
This tutorial was created on July 14,2014 by Rhonda
Any resemblance to another Tag or Tutorial is purely coincidental
Sunday, July 13, 2014


This tutorial is written for those with knowledge of PSP
Supplies Needed:
Tube of choice: I'm using the wonderful art work of Danny Lee
You can purchase his tubes at S&C HERE
PTU Scrap Kit by Purple Dream Scraps called Devils Blood
You can purchase this awesome kit HERE
Mask #59 by Millie HERE
Open a blank image 700x700
Open frame 3 and place as a new image
Resize and rotate 90 to the left
Duplicate image mirror
Merge the frames as one
Grab the magik wand and click inside frame
Select modify expand by 5
Open paper 5 and place as a new layer
selections invert - delete
Xero Radiance with settings of choice
I used the following:
Decor
Glitter
Handprint
Knife
Leaves 2
Lightening
Roses
Skull
Skull Cross
Sparkles
Spider
Spider 2
Vine
Open paper of choice and apply mask
Add the Copyright and your License Number for the tube
Resize to your liking and save as PNG
This tutorial was created on July 13,2014 by Rhonda
Any resemblance to another Tag or Tutorial is purely coincidental

This tutorial is written for those with knowledge of PSP
Supplies Needed:
Tube of choice: I'm using the wonderful art work of Ted Hammond
Which you must obtain a license to use at CDO HERE
PTU Scrap Kit by Chachaz Creations called Tiki Beach
You an purchase this awesome kit HERE
Mask of choice
Just place your elements where you want them
Open element 40 and place in center
Grab the magic wand and click inside frame
Selections modify expand by 8
Open paper 4 and paste into selection
I used the following:
Element 2
Element 13
Element 15
Element 21
Element 27
Element 30
Element 34
Element 35
Element 47
Element 50
Element 52
Open paper 3 and apply mask
Add the Copyright and your License Number for the tube
Resize to your liking and save as PNG
This tutorial was created on July 13,2014 by Rhonda
Any resemblance to another Tag or Tutorial is purely coincidental
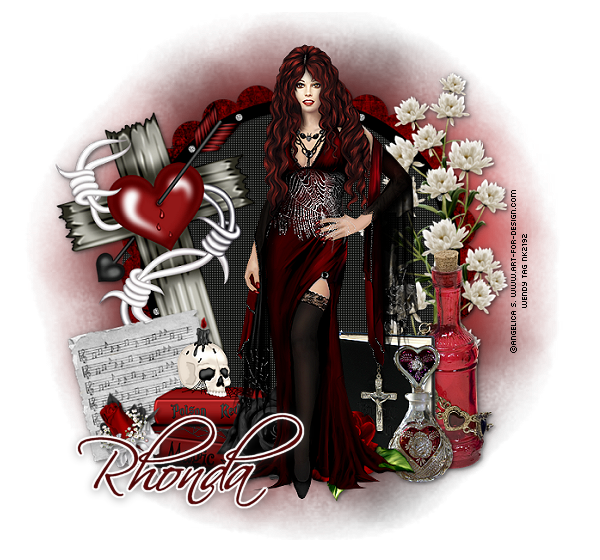
Wednesday, July 9, 2014

This tutorial is written for those with knowledge of PSP
Supplies Needed:
Tube of choice: I'm using the wonderful art work of Elias Chatzoudis
Which you must obtain a license to use at his store HERE
PTU Scrap Kit by Jen from Sweet Temptations called "Danger Zone"
You an purchase this awesome kit HERE
Template #419 by Millie HERE
Mask by Moonbeams & Spiderwebs HERE
Mask #33 by Chrissy's Chaos HERE
Don't forget to leave a thank you when downloading
Xero Radiance
PhotoEffex Scanlines
Penta Color Dot
Penta Dot & Cross
Fliters Unliminted
Eyecandy Gradient Glow
Open template - Shift D to duplicate then close out original
Canvas size 700x670
delete copyright
paste a paper of choice from the kit - I used paper10
selection invert delete
select none delete the original
paste a paper of choice from the kit - I used paper4
selection invert delete
select none delete the original
paste a paper of choice from the kit - I used paper8
select none delete the original
add noise with settings of choice
paste a paper of choice from the kit - I used paper7
selection invert delete
select none delete the original
add new layer & apply solid color of choice
select none delete the original
apply Filters Unliminted Fine Canvas
add new layer & apply gradient of choice
apply Penta color dot with settings of choice
select none delete the original
change blend settings to screen
apply PhotoEffex to tube
apply Penta Dot & Cross to tube
apply Eyecandy Gradient Glow Pride
Xero Radiance with settings of choice
I used the following:
Bomb
Bottle
Bullet Holes
Crime Scene Tape
Cupcake1
Feather
Gun
Kitty1
Rose
Satin Bag
Sign
Spiked Heart
Open paper 5 & apply mask by Moonbeams
Open paper 6 & apply mask by Chrissy
Add the Copyright and your License Number for the tube
Resize to your liking and save as PNG
This tutorial was created on July 8,2014 by Rhonda
Any resemblance to another Tag or Tutorial is purely coincidental
Saturday, July 5, 2014

This tutorial is written for those with knowledge of PSP
Supplies Needed:
Tube of choice: I'm using the wonderful art work of Keith Garvey
You must obtain a license to use his art HERE
PTU Scrapkit Collab Mix & Match - I used the kit from Design by Sarah
You an purchase this awesome kit at Pimp My Tags With Scraps HERE
Template #96 from Rose HERE
Temp downloads are on right hand side of blog
Mask by Whippy HERE
Xero Radiance
Open template - Shift D to duplicate then close out original
Canvas size 700x700
delete copyright,wordart and sparkles
paste a paper of choice from the kit - I used paper11
selection invert delete
select none delete the original
paste a paper of choice from the kit - I used paper5
selection invert delete
select none delete the original
paste a paper of choice from the kit - I used paper2
selection invert delete
select none delete the original
add closeup of tube you are using
select none delete the original
apply Xero Radiance with default settings
paste a paper of choice from the kit - I used paper8
selection invert delete
select none delete the original
add noise
Xero Radiance with settings of choice
I used the following:
Flower 1
Flower 2
Flower 3
Ribbon 4
Stars 3
Open paper 12 & apply mask
Add the Copyright and your License Number for the tube
Resize to your liking and save as PNG
This tutorial was created on July 5,2014 by Rhonda
Any resemblance to another Tag or Tutorial is purely coincidental
Friday, July 4, 2014

Thursday, July 3, 2014

This tutorial is written for those with knowledge of PSP
Supplies Needed:
Tube of choice: I'm using the wonderful art work of Trinita
Which you must obtain a license to use at PFD HERE
PTU Scrap Kit by Chachaz Creations called 4th July Celebration
You an purchase this awesome kit HERE
Just place your elements where you want them
Open element 18 and place to left
Grab the magic wand and click inside frame
Selections modify expand by 8
Open paper 6 and paste as new layer
Selections invert delete
Move paper under frame
I used the following:
Element 2
Element 3
Element 5
Element 23
Element 27
Element 33
Element 34
Element 42
Element 43
Element 56
Element 57
Add the Copyright and your License Number for the tube
Resize to your liking and save as PNG
This tutorial was created on July 3,2014 by Rhonda
Any resemblance to another Tag or Tutorial is purely coincidental


This tutorial is written for those with knowledge of PSP
Supplies Needed:
Tube of choice: I'm using the wonderful art work of Elias Chatzoudis
This tube was purchased at MPT which has closed
You must obtain a license to use his art HERE
PTU Scrapkit Collab Mix & Match - I used the kit from TammyKat
You an purchase this awesome kit at Pimp My Tags With Scraps HERE
Template #169 from Punky Butts HERE
Mask #410 by Vix HERE
Xero Radiance
We'll start with the template
Open template - Shift D to duplicate then close out original
Resize all layers
Canvas size 700x700
delete copyright
paste a paper of choice from the kit - I used paper red
selection invert delete
select none delete the original
paste a paper of choice from the kit - I used paper blue
selection invert delete
select none delete the original
paste a paper of choice from the kit - I used paper gradient
selection invert delete
select none delete the original
add new layer and flood fill with grey color
select none delete the original
add noise
paste a paper of choice from the kit - I used paper blue stars
selection invert delete
select none delete the original
add new layer and flood fill with grey color
select none delete the original
add noise
Xero Radiance with settings of choice
I used the following:
Boom Pop
Blue Fireworks
Fireworks red
Hat
Rocket White Flower
Open word art paper & apply mask
Add the Copyright and your License Number for the tube
Resize to your liking and save as PNG
This tutorial was created on July 3,2014 by Rhonda
Any resemblance to another Tag or Tutorial is purely coincidental
apply close up of tube
use solid color on border & add noise
merge layers
add the Copyright and your License Number

This tutorial is written for those with knowledge of PSP
Supplies Needed:
Tube of choice: I'm using the wonderful art work of Barbara Jensen
You can purchase these tubes at her store HERE
FTU Scrap Kit by Mizteeque HERE
Template #238 by Toxic Desirez HERE
Mask #30 by Moonbeams & Spiderwebs HERE
Don't forget to leave a thank you when downloading
Xero Radiance
Xero Fritillary
Open template - Shift D to duplicate then close out original
Resize template
Canvas size 700x700
Delete copyright,rasters 4&11
paste a paper of choice from the kit - I used paper3
selection invert delete
select none delete the original
add new layer & flood fill with solid color of choice
select none delete the original
add noise
paste a paper of choice from the kit - I used paper7
selection invert delete
select none delete the original
paste a paper of choice from the kit - I used paper5
selection invert delete
select none delete the original
paste a paper of choice from the kit - I used paper1
selection invert delete
select none delete the original
add new layer & flood fill with solid color of choice
select none delete the original
add blinds effect
add new layer & flood fill with solid color of choice
select none delete the original
add Xero Fritillary
add new layer & flood fill with solid color of choice
select none delete the original
add noise
add new layer & flood fill with solid color of choice
select none delete the original
add noise
paste a paper of choice from the kit - I used paper6
selection invert delete
select none delete the original
apply Xero Radiance
I used the following:
Element 2
Element 4
Element 11
Element 18
Element 22
Element 34
Element 41
Element 44
Open paper 8 & apply mask
Add the Copyright and your License Number for the tube
Resize to your liking and save as PNG
This tutorial was created on July 3,2014 by Rhonda
Any resemblance to another Tag or Tutorial is purely coincidental


Subscribe to:
Posts
(Atom)
Grab My Blinkie

I CT For


Blogs I Visit


